Reducing Sports Injuries
Why is Athlete Posture Critical to Safety and Performance?
Player posture determines hamstring and muscle tightness, energy expenditure, and risk of injury. Good posture is the S-Shaped spine and is supported by mathematical proofs first presented by John S. Scherger, D.C. Good posture takes stress off joints, makes you stronger, gives you energy, and keeps you healthier, and the below listed reasons are why.
Dr. Scherger loved football and assembled a team of experts including US Olympic Team Trainers, and Ron O'Neil, Athletic Trainer from the New England Patriots. The team developed Spinal Fitness exercises to create the superior athlete.
The History of Spinal Fitness
Eileen Durfee met John S. Scherger, D.C. in 1978 when she was run over by a car and Dr. Scherger used exercises to restore curves in her spine.
In an almost 20-year study, a team of experts led by Dr. Scherger determined the best spine shape for athleticism. Then they developed the corrective exercises and published the results.
Read the History of the New England Patriots
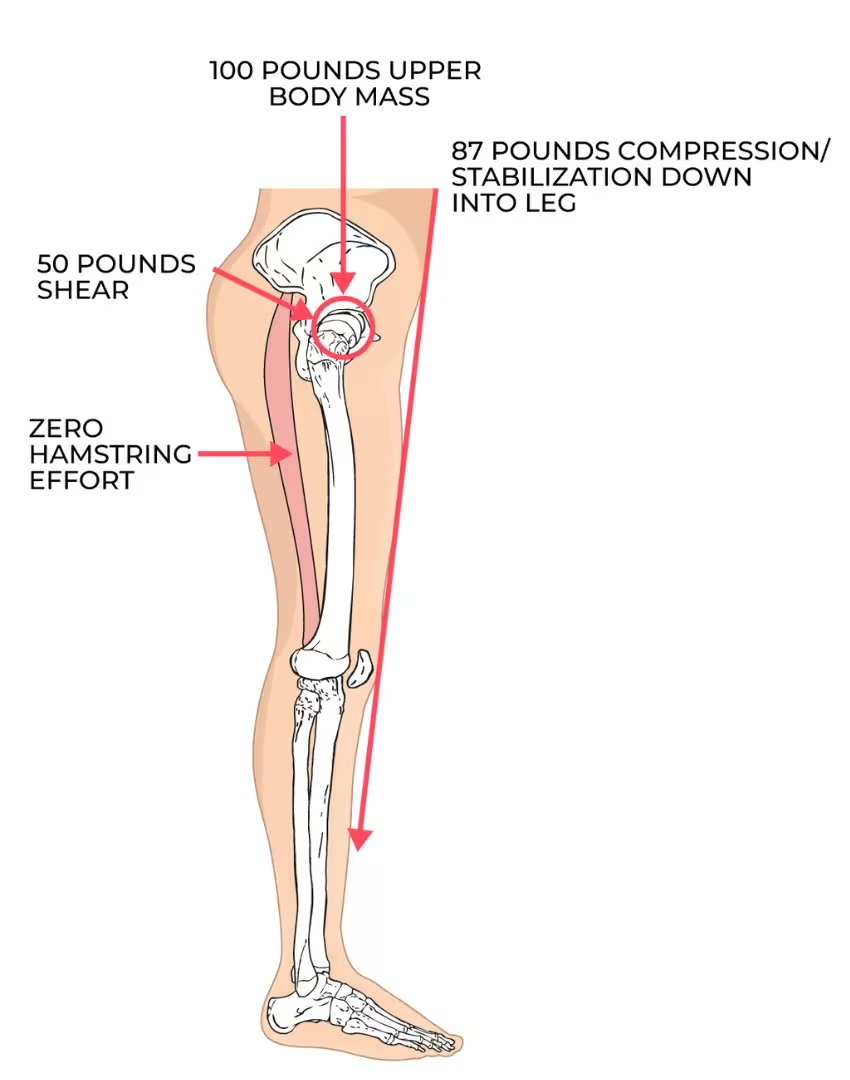
Why the S-Shaped Spine is Best!
Low Back Comparison L2, L3
Good Posture
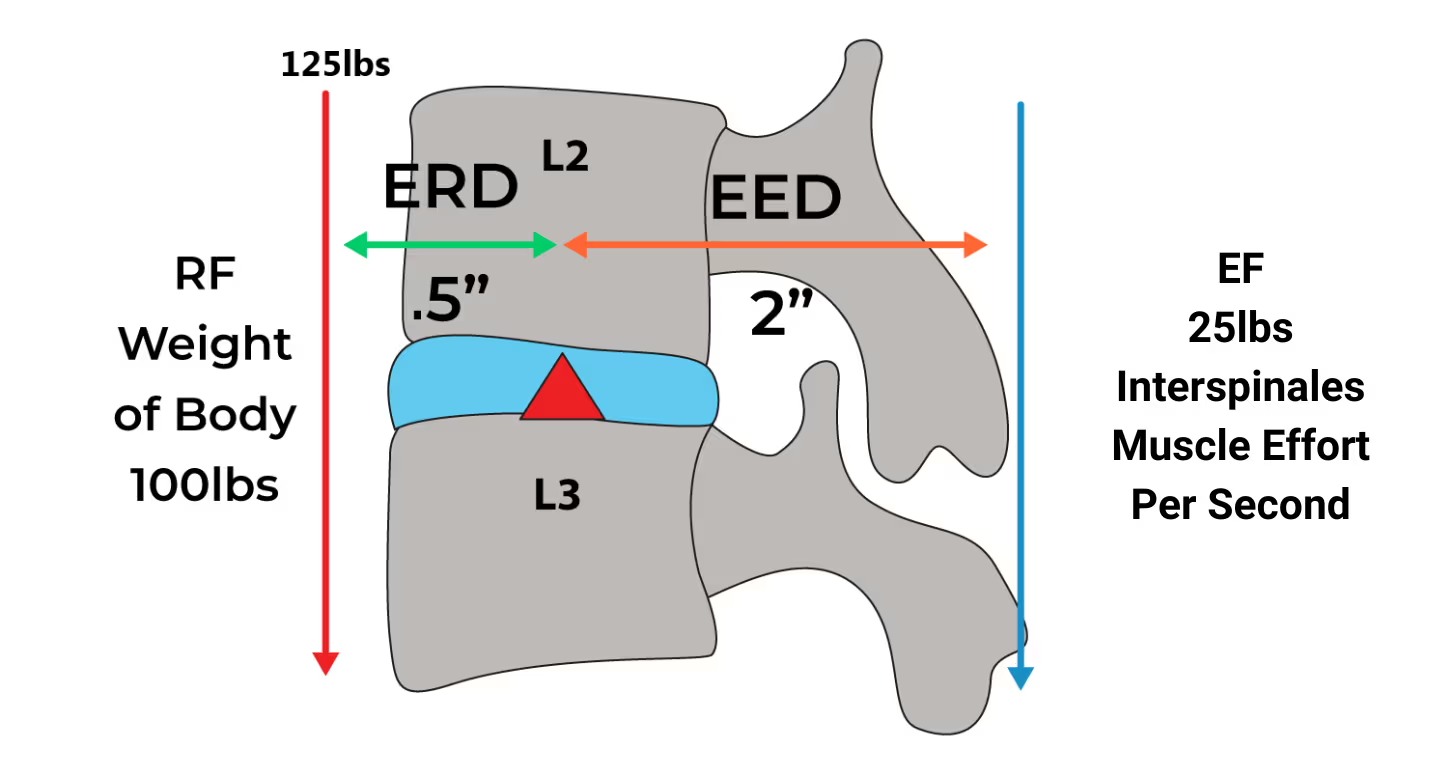
Good Posture: When the spine has the S-shape, the head is balanced over the pelvis.
The balancing point of the spine is at Lumbar vertebrae L2 on L3, and with good posture, the interspinales muscle effort works less at 25 pounds per second versus 200 pounds per second with poor posture.
Compression with good posture is 125 pounds versus 300 pounds.
Less total muscle effort means more available effort for strength and performance with less fatigue.
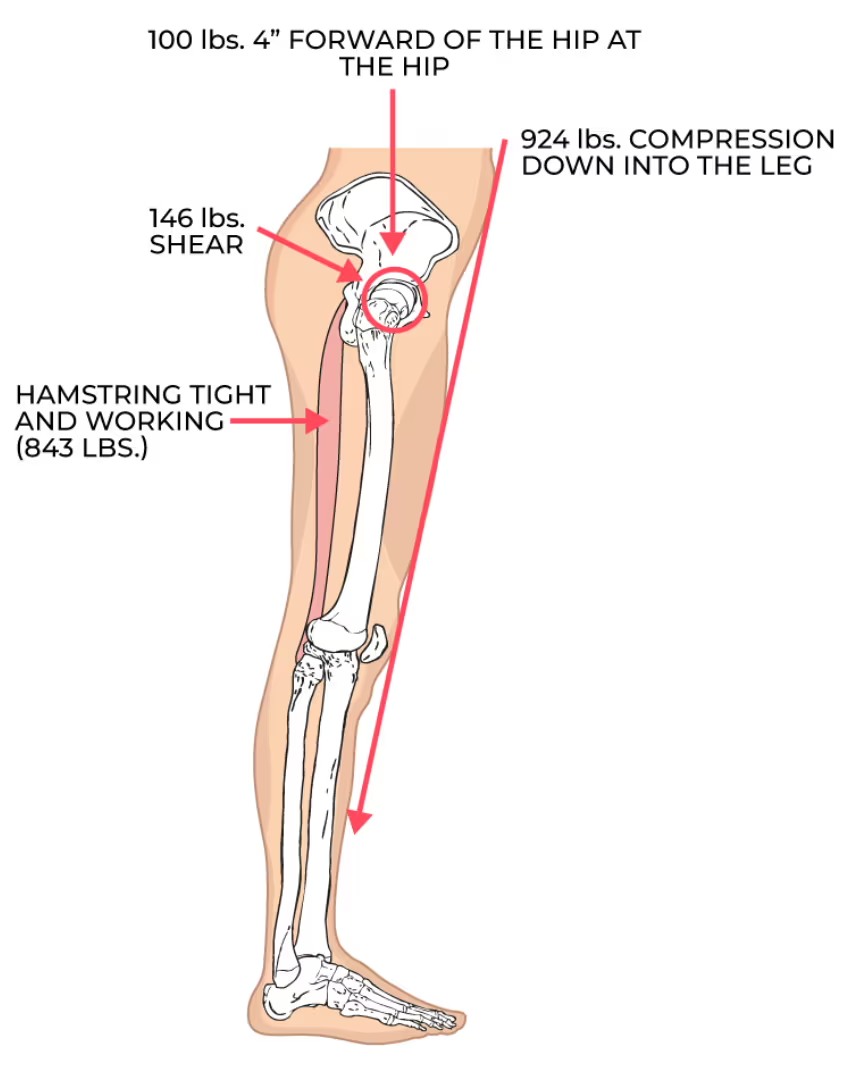
Bad Posture
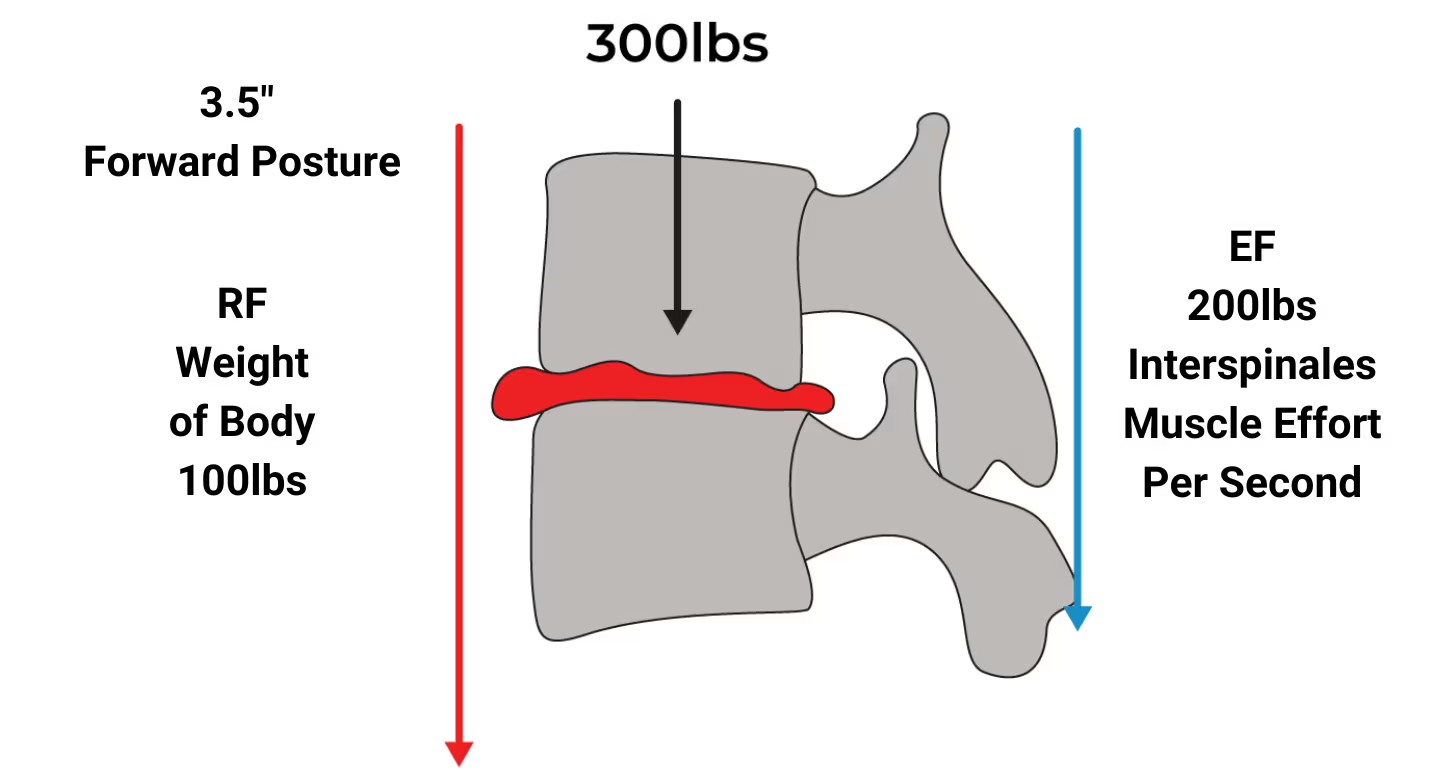
When the upper trunk and head are too far forward, muscles tighten to hold the body erect.
With just 3.5” of forward posture, the interspinales muscle effort increases to 200 pounds per second, and compression increases from 125 to 300 pounds!
Forces can cause injury and degeneration when spinal discs become dehydrated and compressed.
In addition, the short, weak postural muscles fatigue, and the long muscles (hamstrings) help hold the body erect. Consequently, movement becomes restricted.
Hamstring Comparison
Tight hamstrings are one of the top indicators that the player does not have deep enough curves to make up an S-Shaped spine. Hamstrings are for locomotion (walking, running, jumping, launching, pushing) and shouldn’t be tight while standing. In addition, less fast twitch muscle recruitment is available, and a shorter stride length occurs when the spine’s shape tightens the hamstrings. Athletes with the S-Shaped spine have loose hamstrings that are entirely devoted to locomotion, stride length, and force propulsion. Athletes with good posture have lower back abdominal strength and effectively launch and hit objects, stand upright, and move things forward.
Good Posture
Good posture expends less energy to exist in gravity. Joints have less compression and shear forces, and will hold up longer without damage and injury.
Bad Posture
Poor posture consumes a lot of energy, and muscles are tight. Joints have damaging amounts of compression and shear, causing premature deterioration and injury.
Understanding Shear
Each vertebra has four joint surfaces (for a total of 364 joints in the spine) that connect to other vertebrae and connect with the spinal discs, ribs, sacrum, skull, and other structures. Good posture creates stability in the human body by eliminating all shear forces and only allowing compression forces at the joints/fulcrum. Posterior shear forces dislocate the vertebrae backward mechanically, causing pinched nerves, bulged discs, and spinal stenosis.
Good Posture
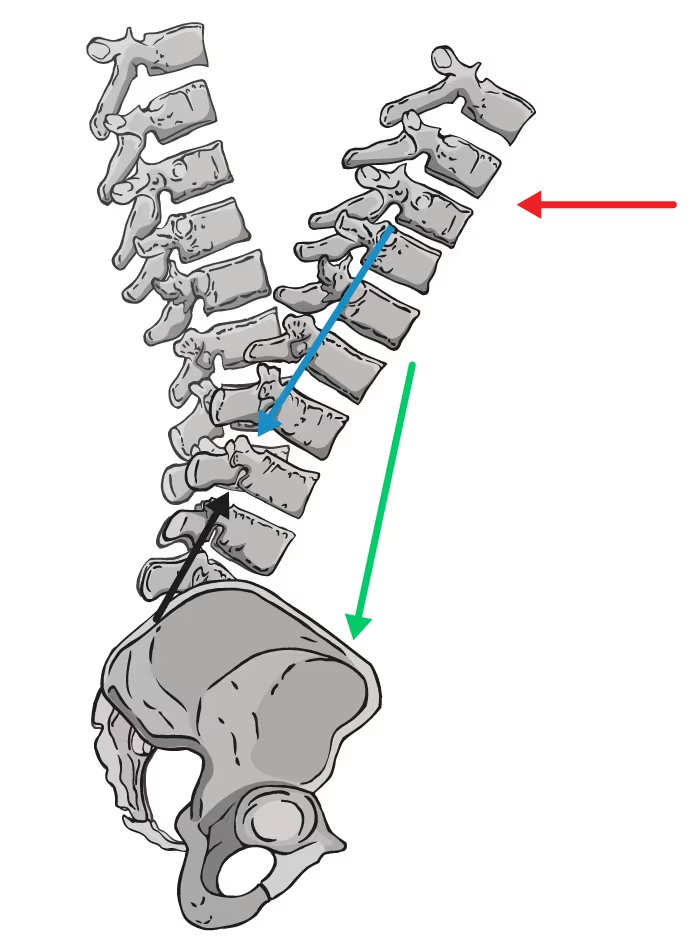
Good posture develops force against resistance in front of the body because the joint surfaces/fulcrum are aligned at 180o. All shear forces are eliminated as the bone facets interlock, creating strength and stability.
When pushing forward, the S-Shaped spine acts as a spinal lever that can move forward, developing greater power and stability simultaneously.
Compression with good posture is 125 pounds versus 300 pounds.
For example, when a football lineman goes head-to-head with an opponent, the player with the big low back curve will always overpower the player with a flatter back. When the S-Shaped spine moves forward, and the facet bones lock into stability, the power from the player's legs translates through the spinal column with force and momentum into the opponent.
Bad Posture
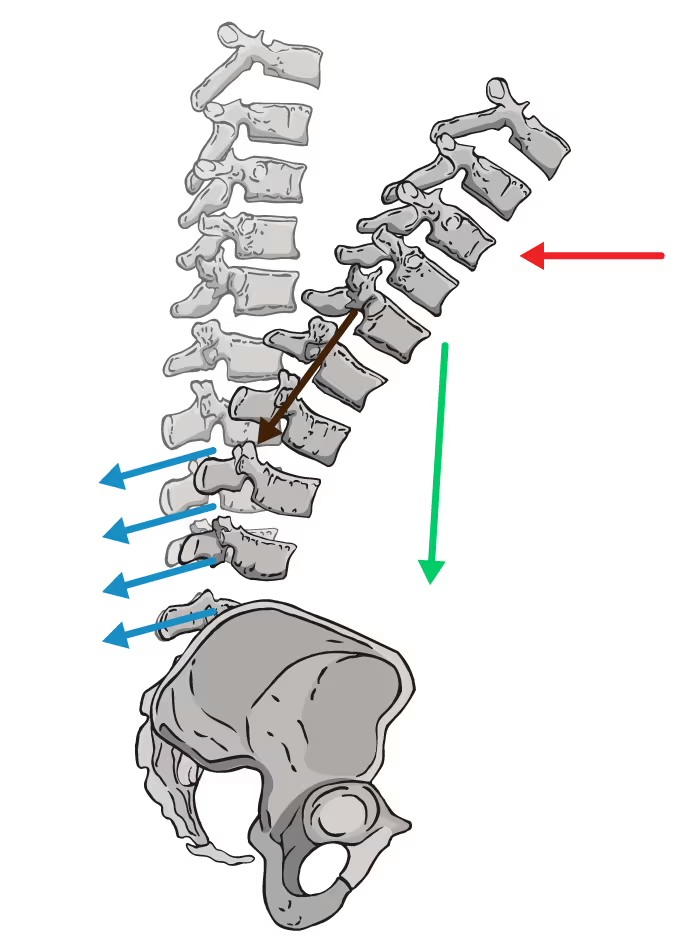
Poor posture lacks deep enough curvature to create the S-Shaped spine. As a result, the joint surfaces/fulcrum are not aligned at 180o and with the resultant force, posterior shear forces are created.
When pushing forward, a spine with poor posture is unstable because the facet bones no longer lock together like a vice, so both compression and shear forces impact the spine. Posterior shear forces dislocate the lower four vertebrae causing pain, injury, and downtime.
Instead of power being translated from the player's legs up the spinal column, shear forces dislocate vertebrae and less force and momentum transfer into the opponent.
Poor posture should expect decreased athleticism and increased injuries.
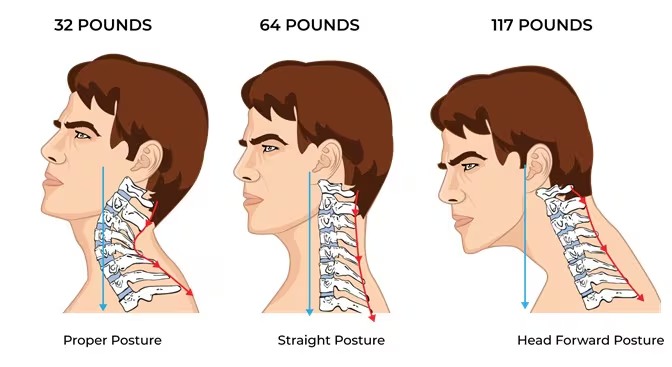
Neck Comparison
Joint Force
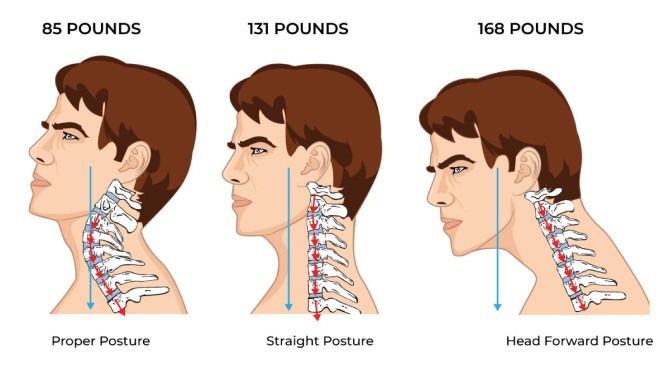
The S-Shaped spine has less joint force than a straight or head-forward posture. As a result, postural muscles tighten with poor posture to hold the body upright, which limits movement and reduces athletic ability.
Additionally, shear forces are created with poor posture, and the facet bones no longer lock together to create stability. Without joint stability vertebrae can dislocate, spinal discs can bulge, nerve canals shift and pinch nerves, and pain, injury and degeneration occur.
Neck pain is a warning sign that the body doesn't have the S-Shaped spine, and action should be taken to restore curvature. Taking pain killers and continuing to play sports will cause further injury. Athletic training programs should include spinal fitness and restore curvature.
Compression
The S-Shaped spine is strong, like a Roman arch, with 30, 60, and 90-degree angles. This example shows joint compression is the least with proper posture. Straight and head-forward postures lack the correct angles and are more bone on top of the bone, compressing the spinal discs.
In disc compression without the S-Shaped spine and the shock absorber effect, the pumping action that removes waste by-products and circulates nutrients in and out of the discs no longer functions.
Without good posture, spinal discs dehydrate, compress, can bulge, and prematurely deteriorate.
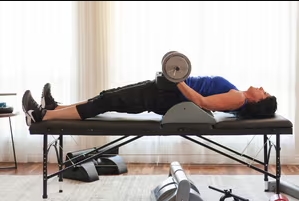
STEP 1: Sit-Up
Global and Segmental Posture
Over Power Cushion
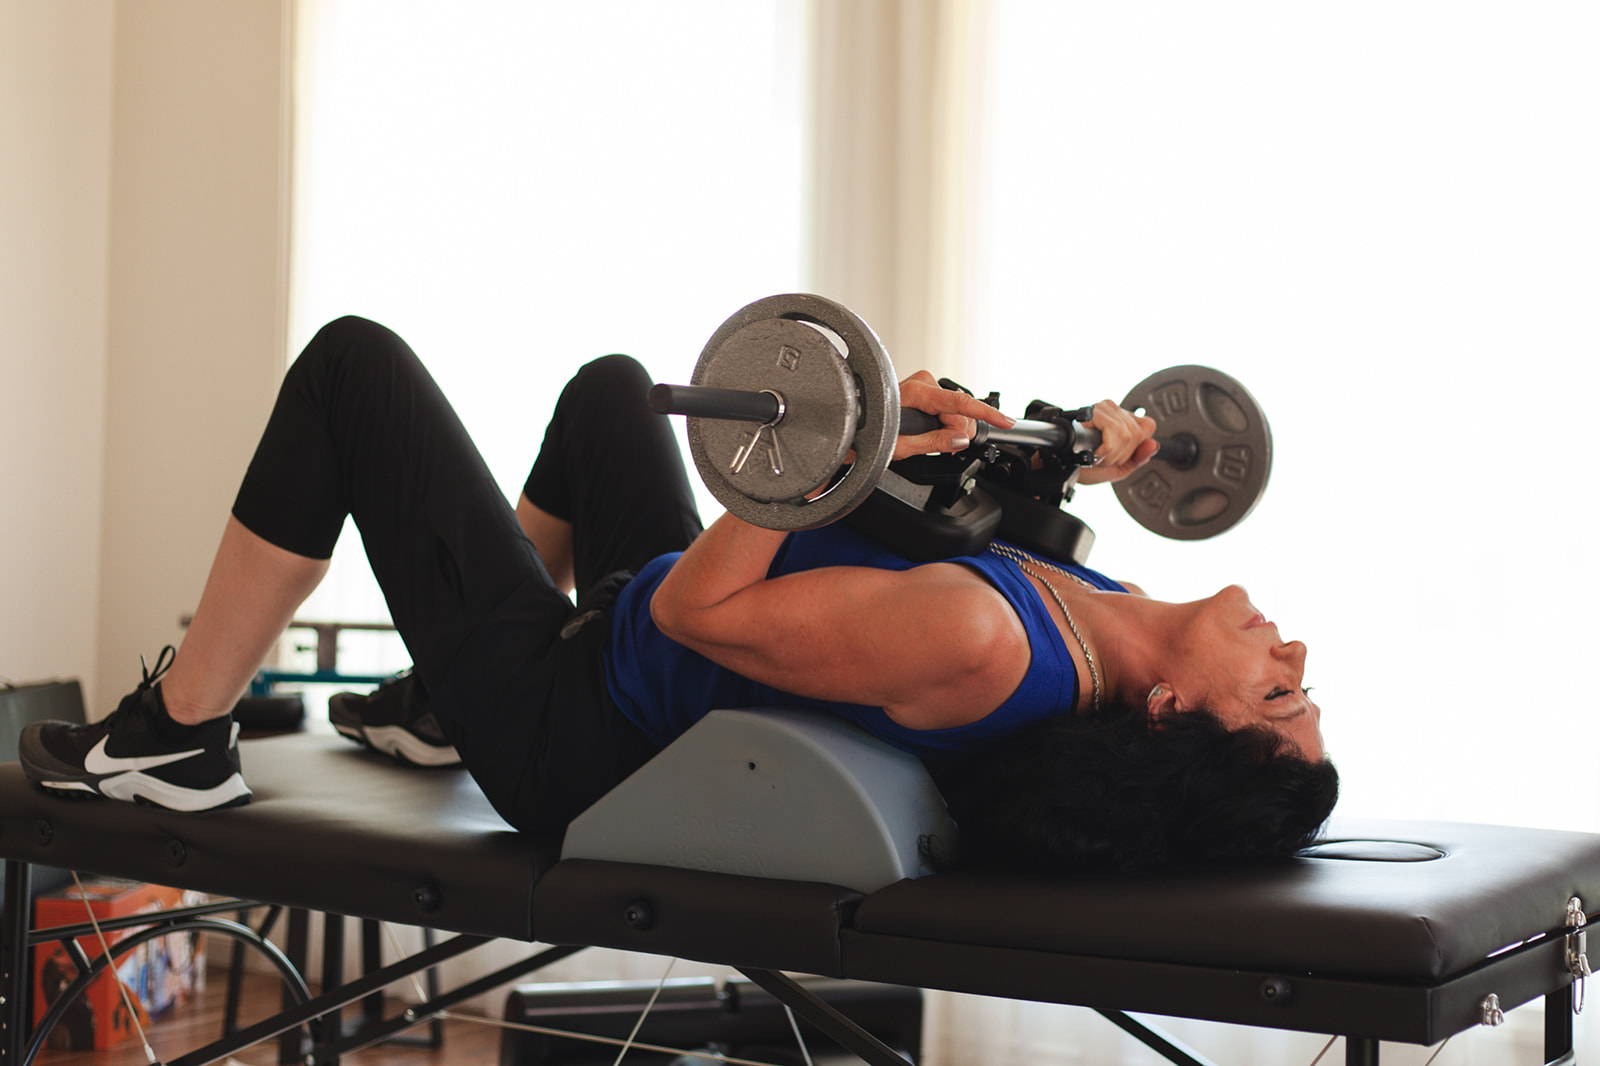
The Power Cushion stops the posterior shear of lumbar vertebrae during the sit-up, and the weighted force applicator creates leverage to provide absolute tension on the external oblique muscles. Doing a sit-up over the Power Cushion improves global and segmental posture.
In the center of the Power Cushion, the patented groove lets the spinous float, and the transverse process edges are supported. Inhale when arching over the Power Cushion; exhale when sitting up to a 45-degree angle; and repeat, starting with ten (10) repetitions. With body weight and the force applicator weight, the vertebrae will crack and go into a more desirable alignment. You may wear a neck support collar if it is difficult to hold your head up without pain.
Watch Video
STEP 2: Back Trac
Joint Hydration, Alignment,
and Segmental Posture
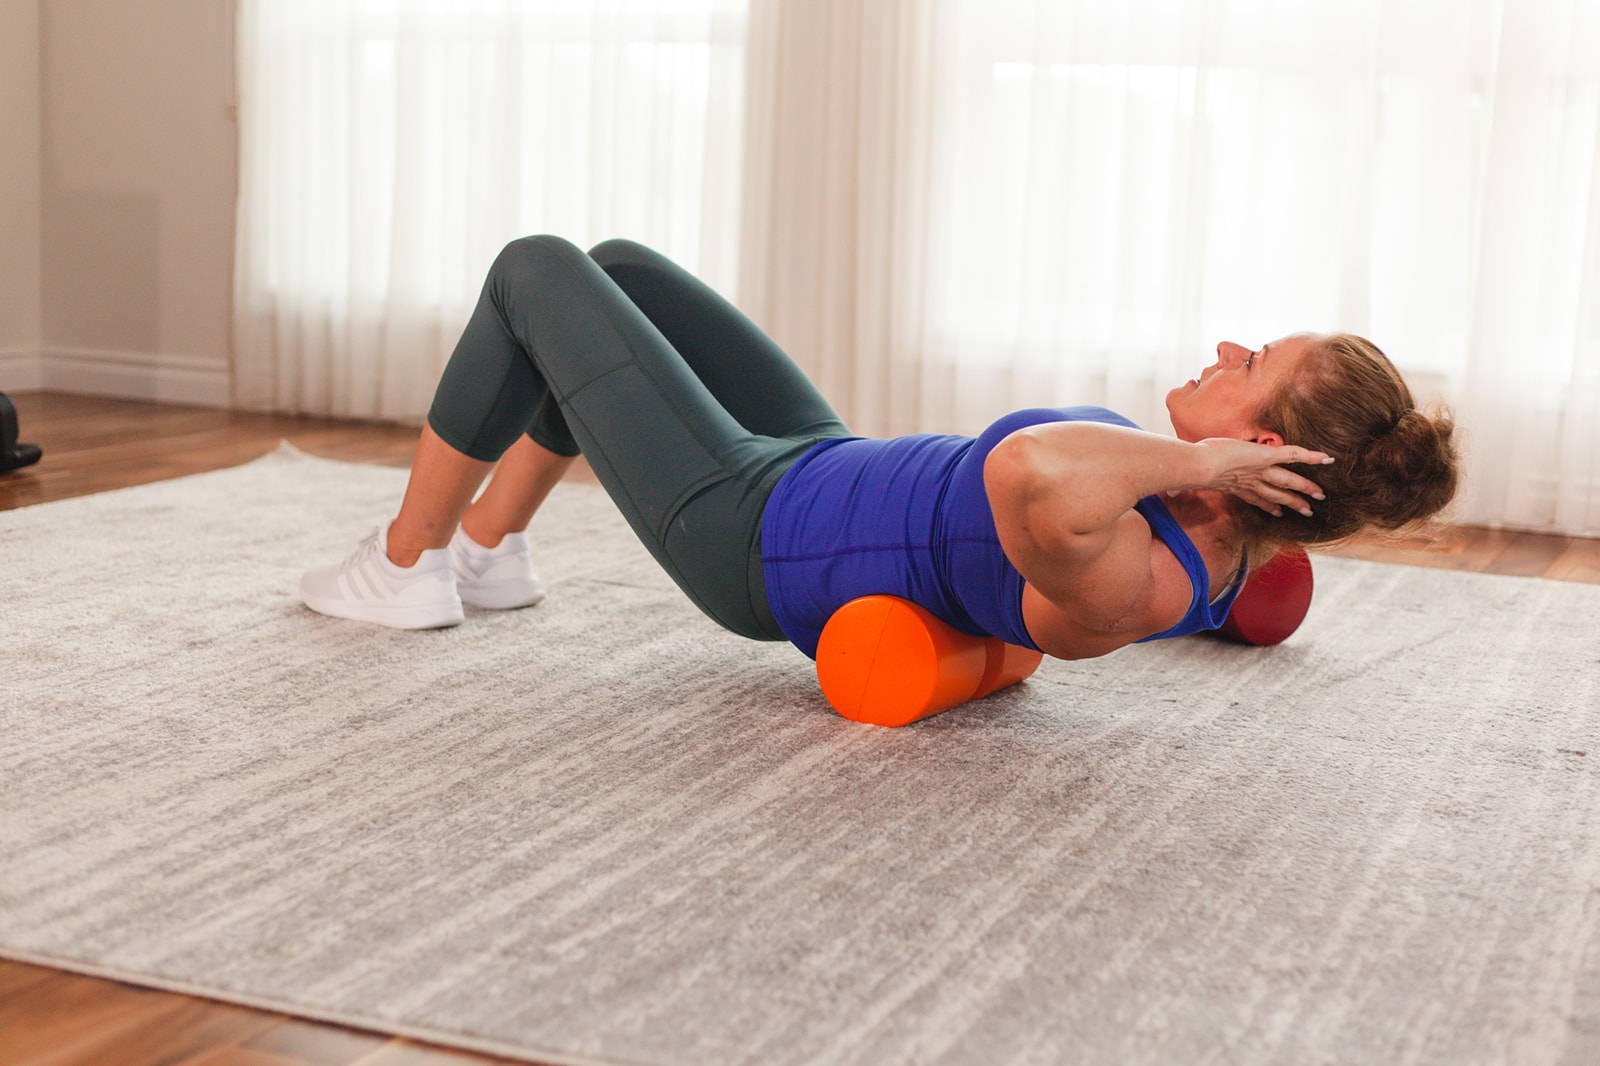
The Back Trac hydrates discs and stretches spinal joints, aligns vertebrae, opens up meninges increasing nerve signaling, and increases spinal fluid movement.
The Back Trac is 6” in diameter and 12” long and comes in two different densities, medium (orange) and maroon (hard). In the center of the Back Trac, the patented groove lets the spinous float, and the transverse process edges are supported. Place the Back Trac on the ground and use your palms to cup the roll as you lay down on top of it. Then, keep weight on the roller, arch your upper body and head over the roll, and use your feet to walk the roll up and down your spine. Roll up and down your spine multiple times to hydrate spinal discs and stretch all the joints. During rolling, your body weight will cause vertebrae to crack and move into a more desirable alignment.
Watch Video
STEP 3: Pelvic Tilt
Segmental Posture
Over Power Cushion
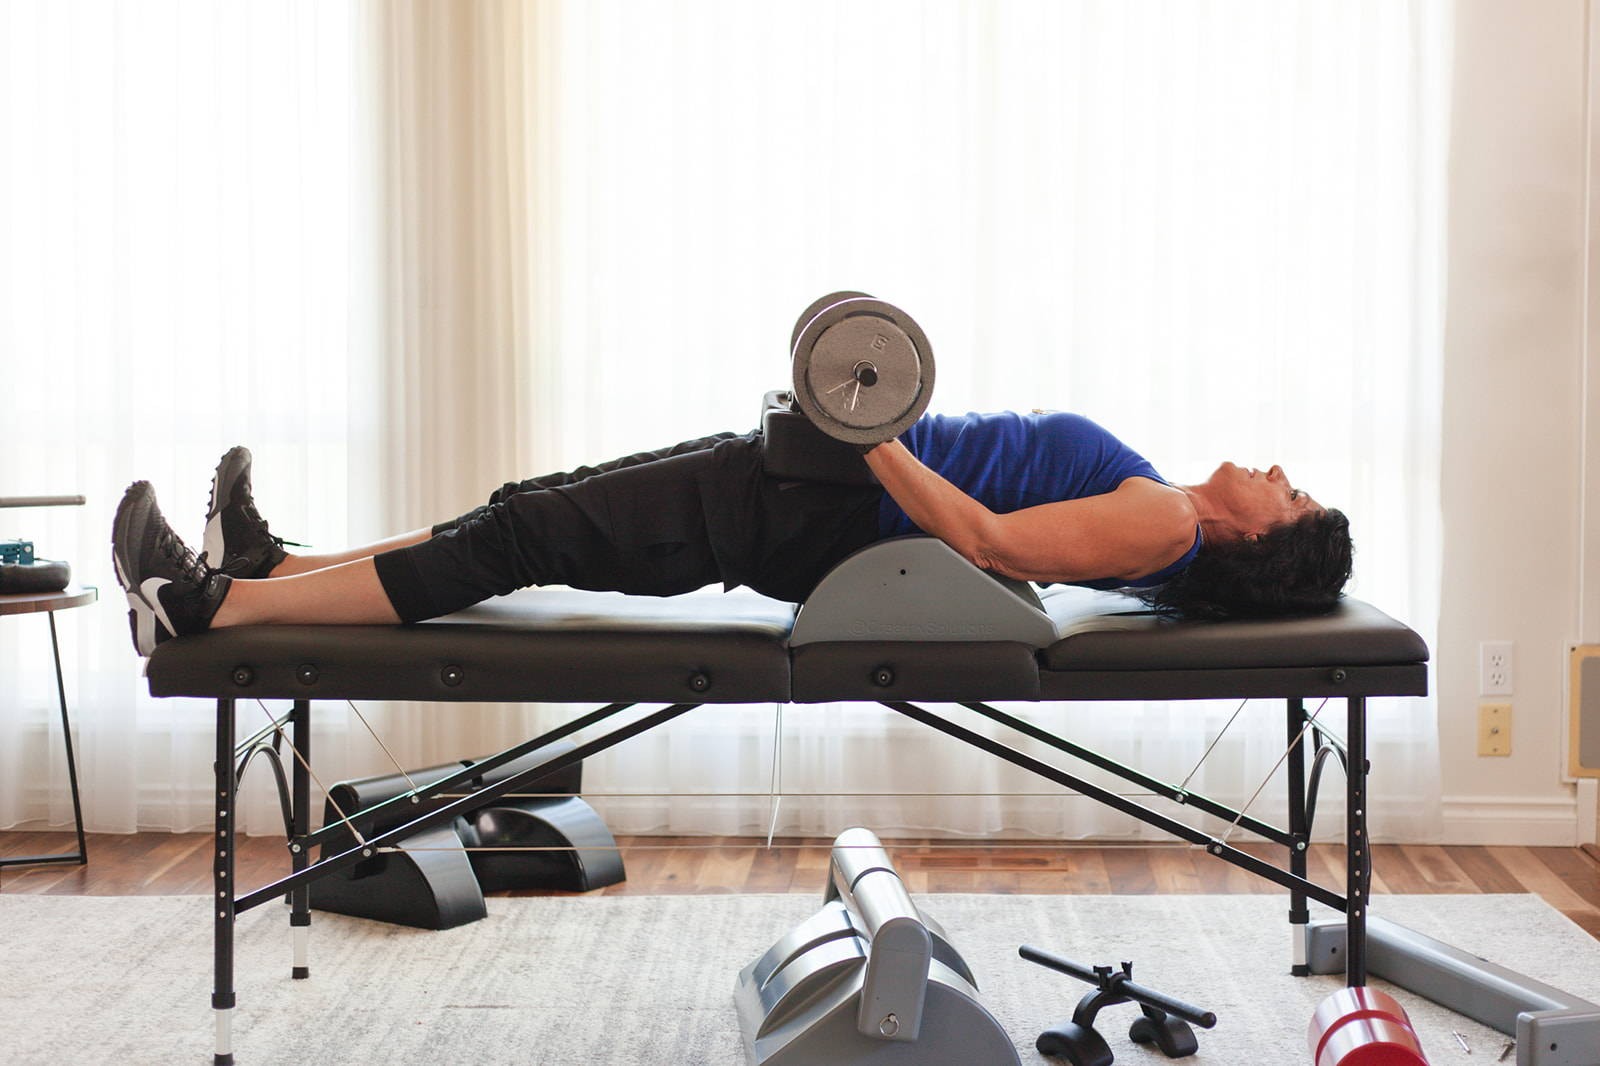
The Pelvic Tilt strengthens the rectus abdominis and the multifidus muscles, and improves segmental posture.
Start by positioning lumbar vertebrae L5, L4, and L3 in the patented groove of the Power Cushion and add weight with the force applicators to the anterior superior iliac spines of the hips. Anchor and extend the upper body back using the forearm supports to stretch out the rectus abdominis muscle. Then relax the pelvis and stretch your buttock into the half-circle cutout on the Power Cushion. Now you are ready to perform the pelvic tilt. Tighten your abdominal muscles, bend your pelvic bone up, lower to the starting position, relax, and repeat. This exercise primarily works the rectus and multifidus and isn’t meant to work the glutes, so relax as instructed.
This exercise creates shear because the weighted leverage on the iliac spines of the hips opposes the direction of the rectus abdominis muscle pull. The shear force causes lumber vertebrae L5 back on L4 to normalize the nerve canal and help eliminate bulging discs.
Watch Video
STEP 4: Neck Flexion
Joint Hydration, Alignment,
and Segmental Posture
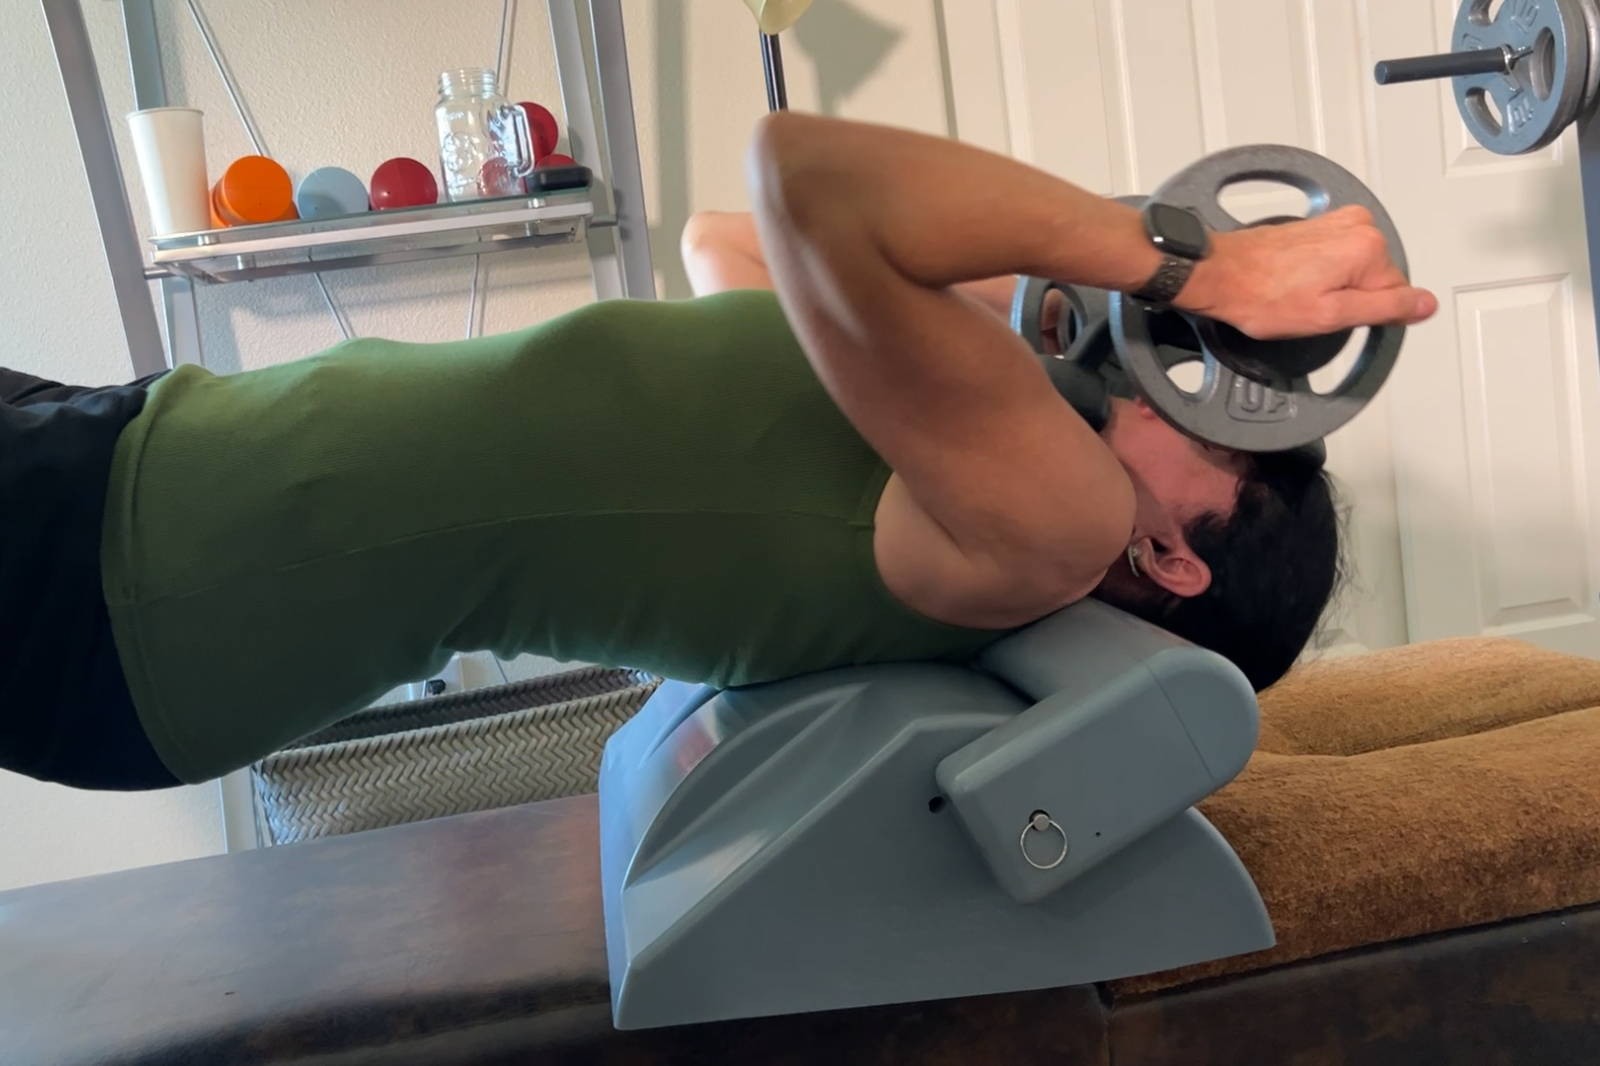
The Neck Shaper improves both segmental and global posture and strengthens the multifidus and interspinales muscles.
It has a padded forehead and chin rest to fit comfortably on the face. Pressure is applied at the ideal location between the forehead and chin with the 1” bar. You can grip the bar, add standard weights, or even use resistance bands to create leverage. The Neck Flexion exercise should initially be performed standing using force applied with your hands. This exercise uses movement like you are knodding your head and agreeing with someone. First, look up to the ceiling tilting your head back, position the Neck Shaper on your face, apply pressure (without pain) as you knod your head to get the chin level or just slightly past level. Then the last step is totally relax your neck, and while applying pressure with your hands push your head back.
Please watch the video for the standing and Power Cushion versions of the Neck Flexion exercise.
Watch Video
STEP 5-A: Back Twist for Disc Molding
and Muscle Relaxixng
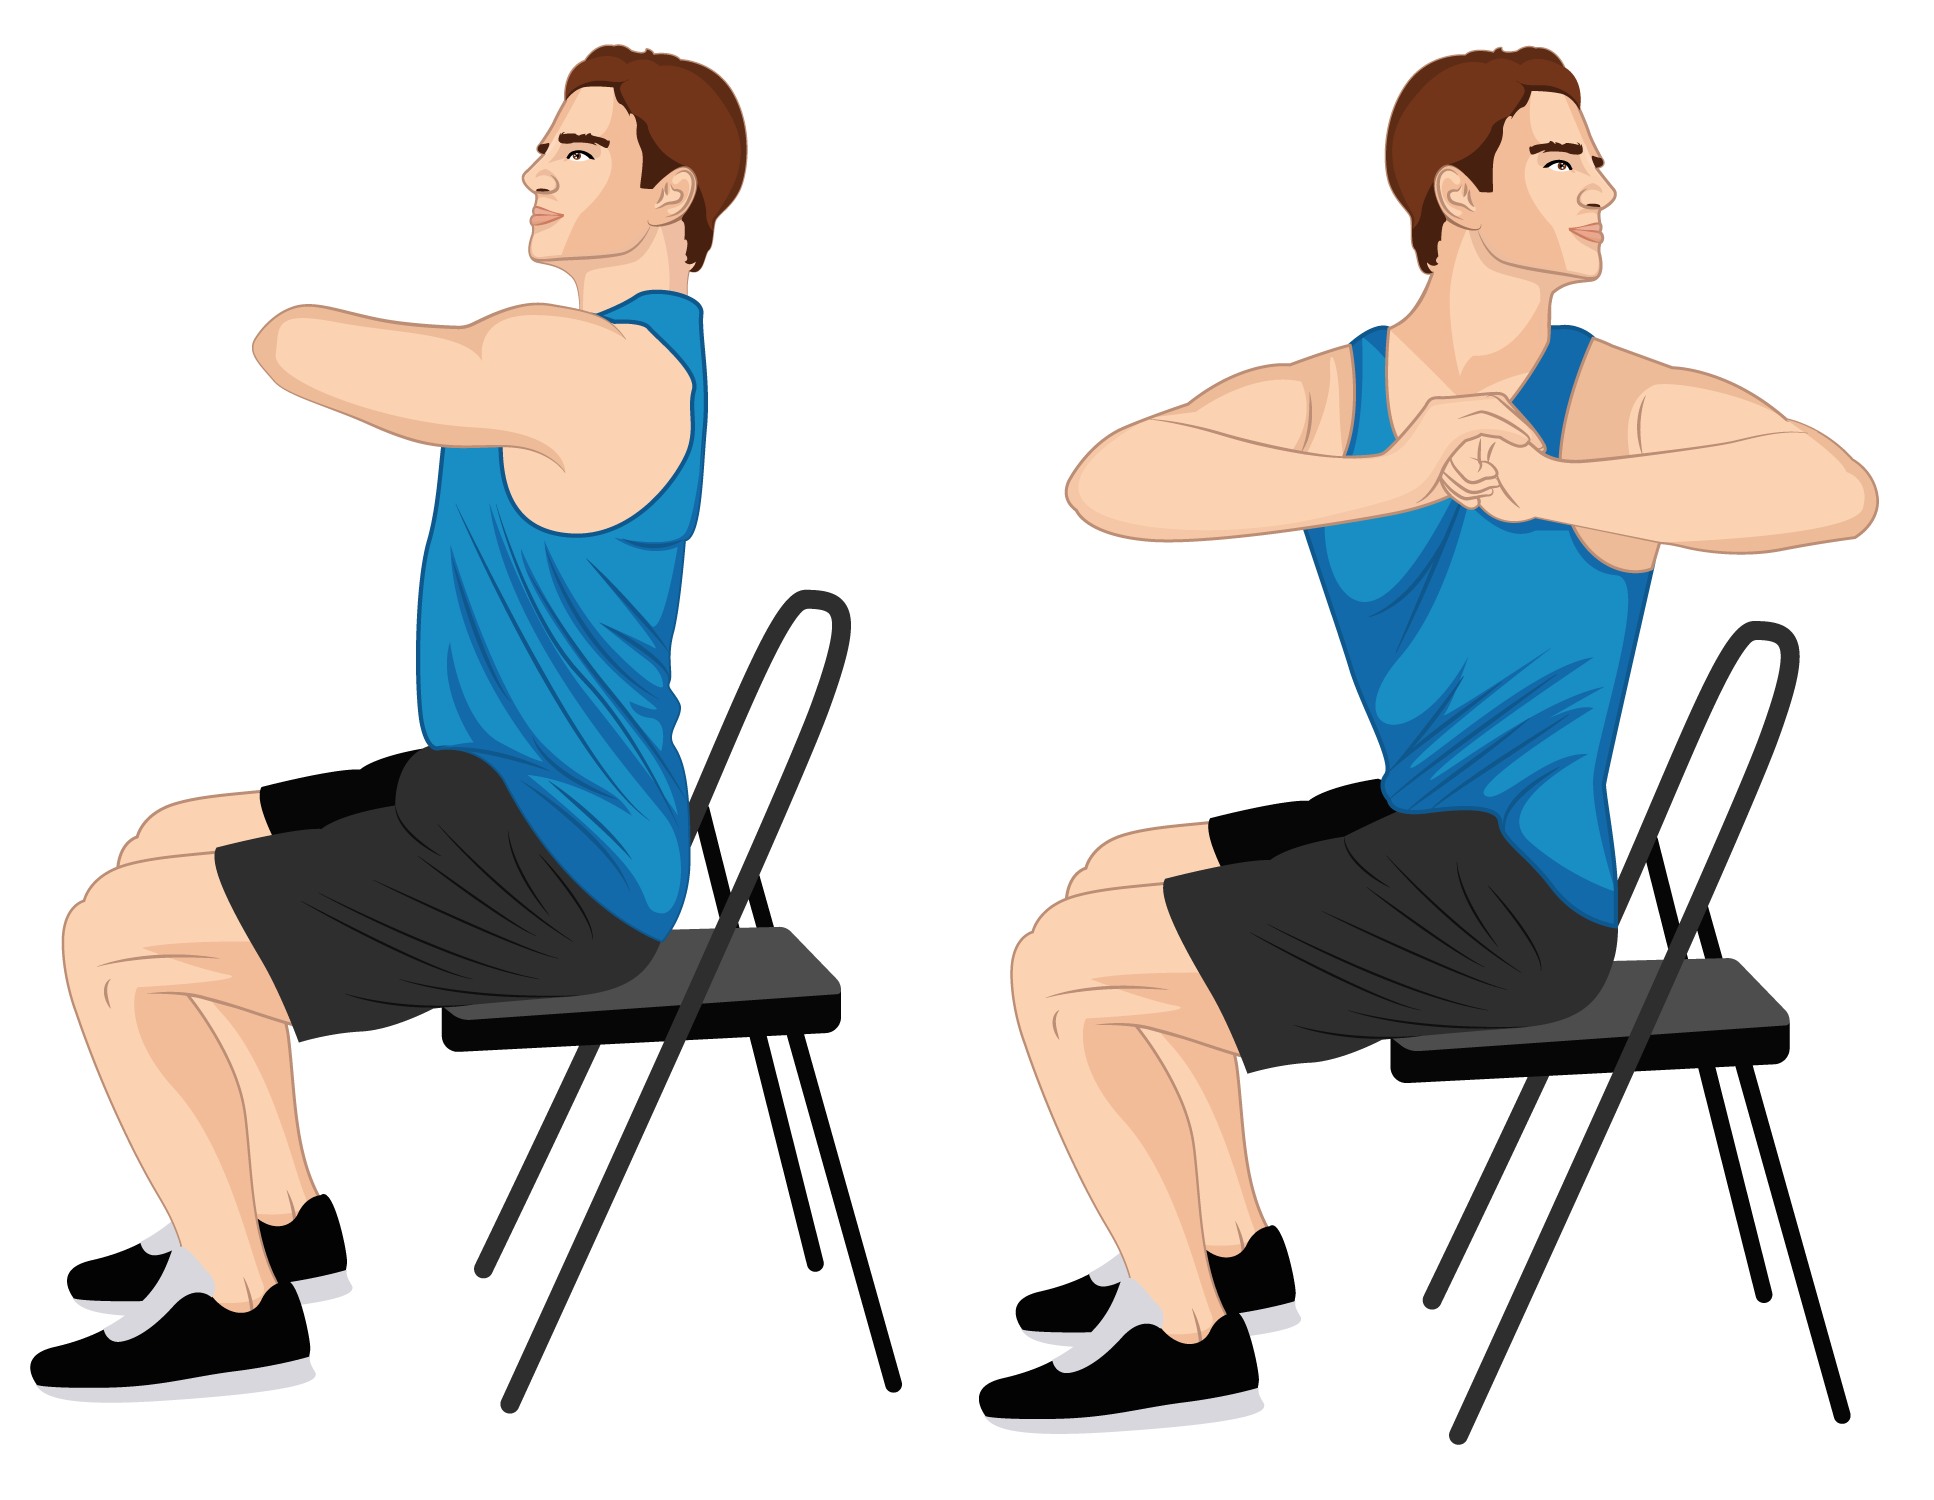
The back twist exercise lubricates the spinal discs mechanically through rotation of the upper trunk. The movement increases circulation and hydrates the spinal discs. In addition, it temporarily changes the consistency of the spinal discs from something like a dried-out sponge to a gelled state.
1. Sit down, arch your lower back and raise your chin. Imagine sitting with a vertical rod positioned through the center of your head, trunk, and hips.
2. Lift your arms shoulder level with the elbows bent out to the side.
3. Twist your spine while looking with your eyes and leading with your head. Look and turn to the left and then look and turn to the right to equal one motion. Pivot around the imaginary rod, and do not lean or reach out from the center of your body while twisting.
4. Repeat the motion 25 times.
STEP 5-B: Immediately Lay over
Neck and Back Shaper Rolls
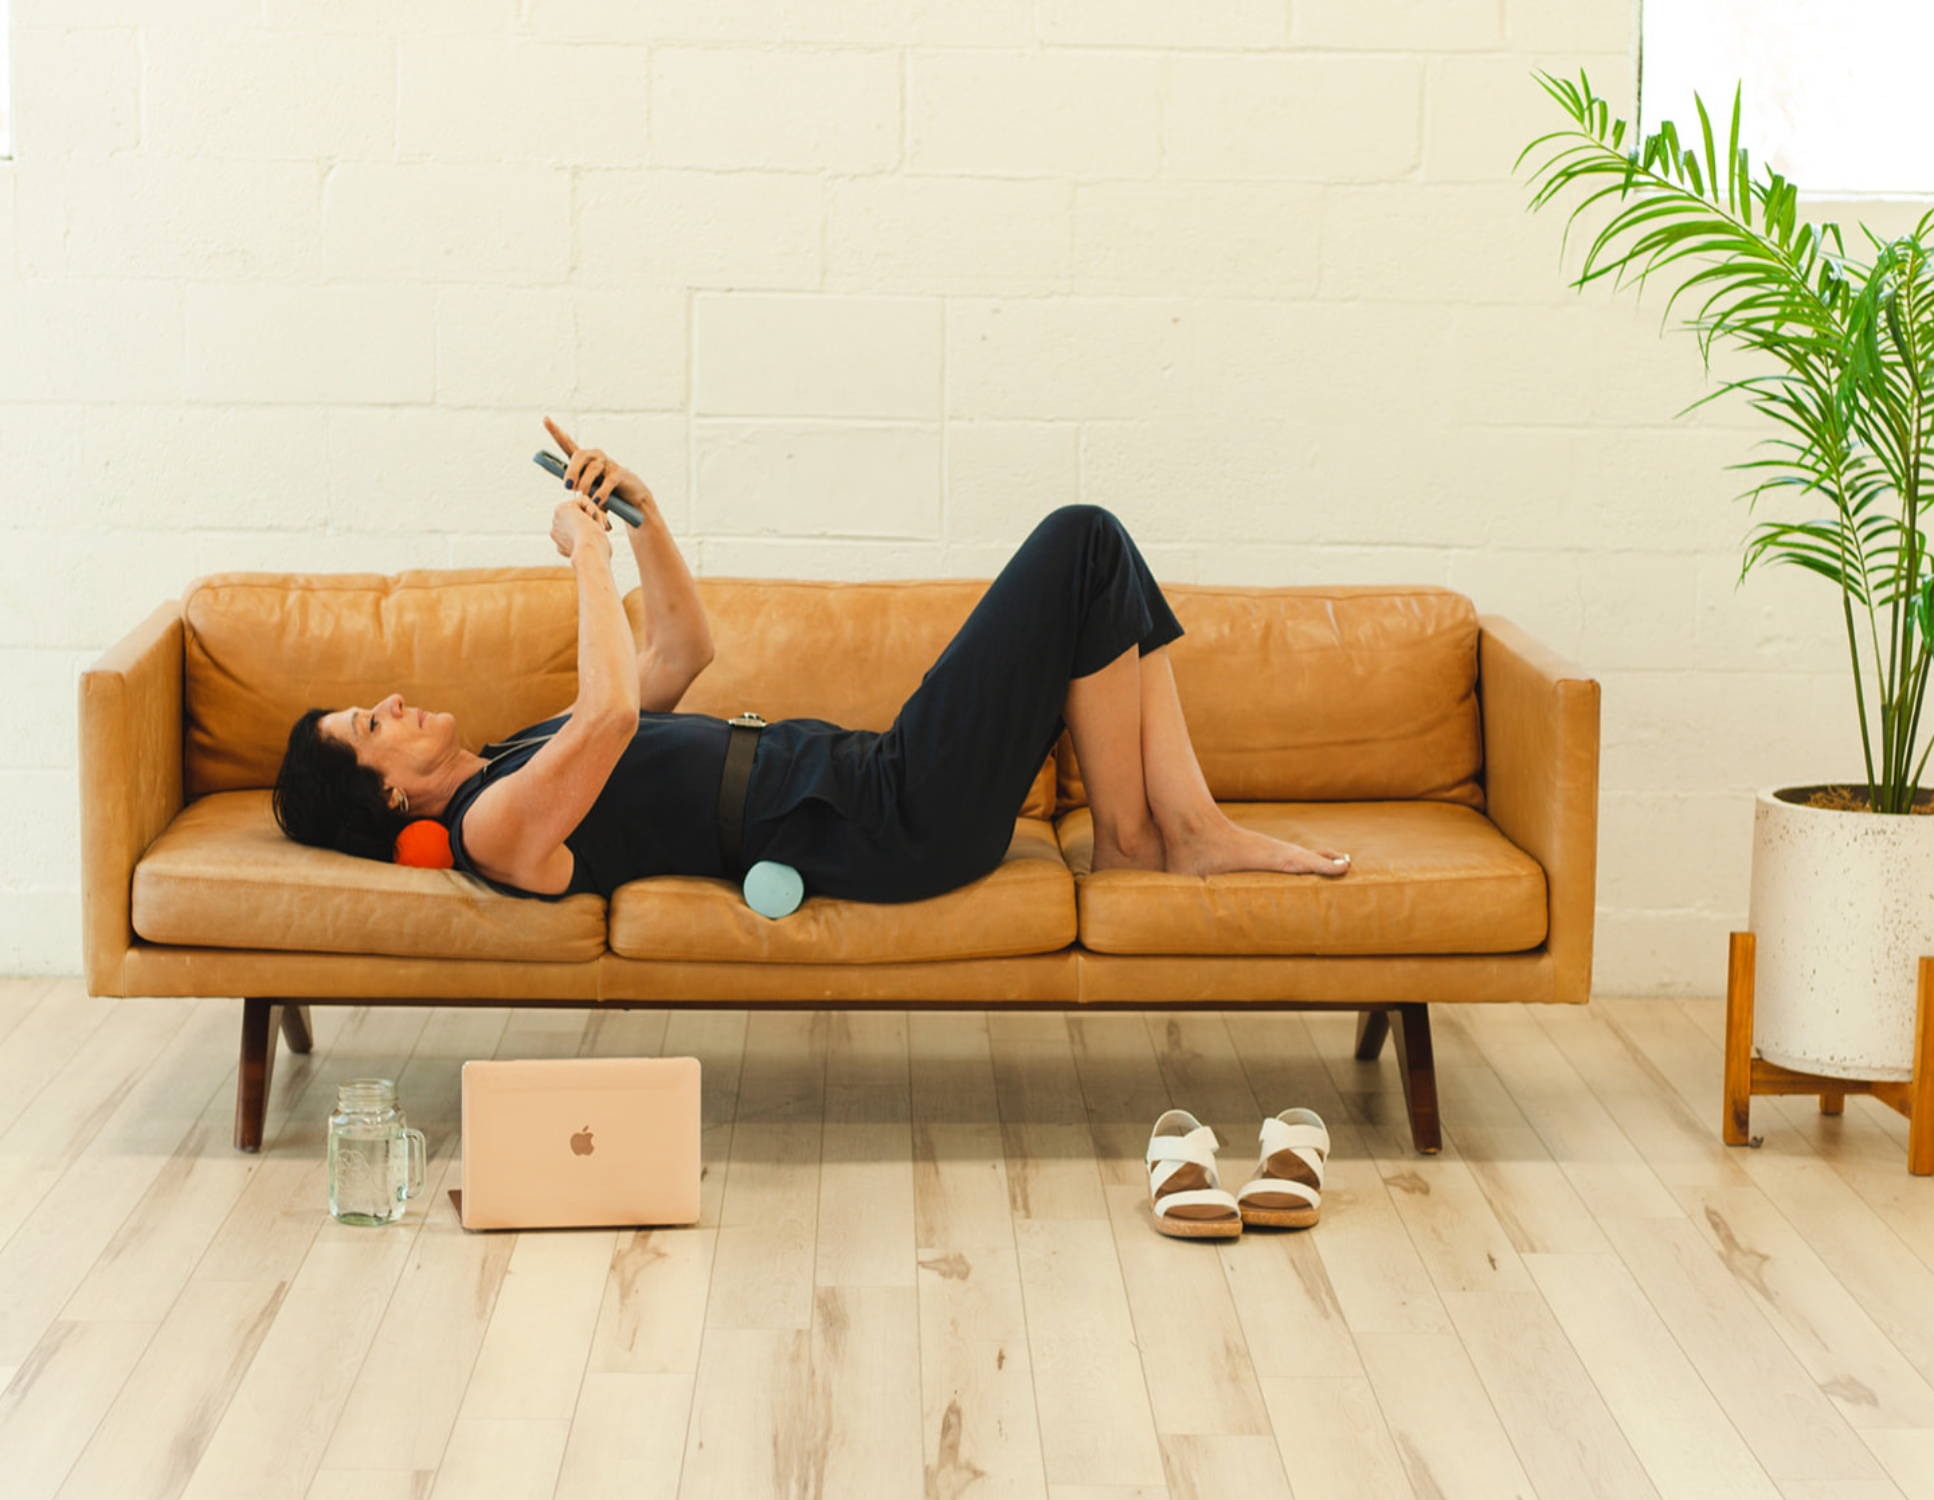
After the back twist, immediately lay down over the neck, and the back shaper rolls and relax. We want the body to be comfortable and relaxed, so the tense muscles will release to let the vertebrae move.
The rolls have a patented groove that lets the spinous float and supports the vertebrae’s transverse process edges on the roll. The neck and back shaper rolls provide segmental traction using your body weight. While laying over the rolls for ideally twenty minutes, gravity no longer causes muscle tension. As the muscles release, you will hear bones crack as the vertebrae drift into a more desirable location.
The rolls come in five different diameters and three different densities to accommodate all types of posture. Over time gradually increase the diameter and density of the rolls to restore proper curvature of the spine.
Professional In-Person Training Services
3 to 5-Day In-Person Athletic Event – Player Health and Athletic Evaluation. We come to you or conduct training via zoom! Learn how to improve Player Posture, Strength, Endurance, Flexibility, and Speed; Reduce Injuries, Surgeries, and Speed Recovery! Additionally, we teach how Metabolic Hair Analysis, Saliva, Urine, and Medical Genetic Testing Assessments, are used to Identify unhealthy trends linked to a variety of issues including Sudden Cardiac Death.
- Spinal Fitness Principles
- Demonstration
- Attendee Evaluations
- Customized Attendee Programs
- Player Training
- Coach Training
- Performance Matrix - Before and After
- Injury Recovery Program
- Protecting the Spine
- Why Hair Analysis?
- 24 Hour Saliva
- Metabonomics – Urine Evaluation
- Medical Genetic Testing