Reliable Suction
A properly sealed pump creates the negative pressure needed to draw solution from the jar.
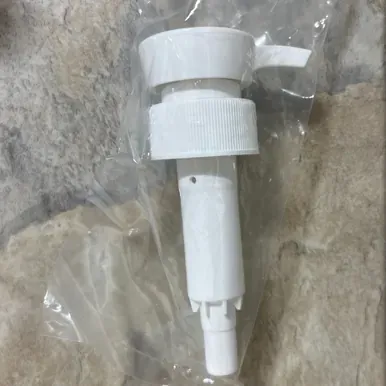
A fresh pump stem for the Enema Fix stand-up, no-mess system
Restore dependable pumping and controlled solution flow with a replacement pump stem made for the Enema Fix Stand Up No Mess Coffee Enema Kit.
Coffee granules, fine sediment, oils, and other debris can build up inside the pump mechanism over time. When cleaning no longer restores smooth operation, replacing the pump stem helps keep the system working efficiently.
The pump stem draws solution from the jar through the intake straw and sends it into the attached tubing. A clean, properly sealed pump supports smooth priming, controlled delivery, and a more organized enema routine.
When the pump becomes clogged or worn, replacing only the pump stem can restore function without replacing the complete Enema Fix system.
A properly sealed pump creates the negative pressure needed to draw solution from the jar.
Manual pump strokes allow the user to pause and regulate flow more directly than gravity-only systems.
Keep the jar, adapter, finger grip, hose, and tips when those components remain in good condition.
Brewed coffee may contain sediment even when the grounds appear to have settled. Fine granules can travel into the draw straw and collect inside the pump stem, check valve, spout, or other narrow passages.
Coffee oils and residue may also dry inside the mechanism when the pump is not flushed immediately after use. Over time, this buildup may cause weak suction, irregular flow, sticking, or complete blockage.
Carefully filter prepared coffee before placing it in the Enema Fix jar. Use a fine paper filter or another method that removes visible grounds and fine sediment. Do not pour unfiltered coffee or loose coffee granules into the system.
Built for repeated use when properly cleaned, filtered, dried, and maintained.
Designed to attach to the Enema Fix adapter, intake straw, finger grip, and replacement hose.
Each pump stroke allows the user to introduce solution gradually and pause when needed.
A practical replacement when the original pump becomes clogged, damaged, or difficult to prime.
Hold the screw cap with one hand and rotate the pump plunger and spout counterclockwise with the other.
Continue turning until the plunger pops up. It may require approximately nine counterclockwise rotations.
Use the long draw straw with the glass jar and the short draw straw with the plastic bottle.
Push the straw securely onto the intake connection on the underside of the pump.
Position the diagonally cut end of the long straw toward the bottom of the jar so the pump can draw solution as the liquid level falls.
Slide the draw straw through the center ring of the finger grip. Position the contoured underside where the fingers can support the assembly while the thumb operates the plunger.
Screw the pump assembly securely onto the jar adapter. Confirm the threads are straight and fully engaged.
Push the hose fitting completely onto the pump spigot. The connection must be straight, tight, and fully seated to prevent leaks and air entry.
The pump works by creating negative pressure. When the plunger rises, it draws solution from the jar through the straw. If the hose, straw, gasket, adapter, or pump connection is loose, room air may enter instead of liquid.
Warm only the end of the tubing adapter briefly with a hair dryer on low heat. Push it fully onto the pump spigot while slightly flexible, then allow it to cool and contract around the connection.
Oil or lubricant can cause the hose to slide off and may prevent an airtight seal. Do not overheat, melt, stretch, or deform the hose fitting.
A small amount of water is normally lost during priming. Continued air bubbles or weak suction indicate that a connection may not be fully sealed.
The replacement pump stem provides manual control over the introduction of solution. Pressing the plunger sends fluid into the hose, while pausing allows pressure and cramping to settle.
The pump is intended for gradual, controlled flow. Excessive pressure can cause discomfort, leakage, tip separation, or injury.
Stop for pain, bleeding, dizziness, or severe discomfort.
Coffee residue becomes harder to remove after it dries. Filtering the coffee and flushing the pump promptly are the two most important steps for preventing clogs.
Hold the screw cap and continue rotating the plunger counterclockwise until the dispenser unlocks.
Check the draw straw, gasket, jar seal, hose fitting, pump lock, and whether the straw reaches the solution.
Flush repeatedly with warm water. Dried coffee oils or fine sediment may be interfering with the mechanism.
Check for a kinked hose, clogged tip, loose fitting, air leak, or sediment inside the pump stem.
Reseat the hose on the pump spigot, confirm the draw straw is tight, and check that the gasket is installed evenly.
When cleaning and resealing do not restore suction or movement, replacement is appropriate.
The Enema Fix system can be refreshed by replacing only the component that is stained, clogged, damaged, or worn.
Replace when the pump becomes clogged, damaged, stiff, or unable to prime.
Replace when tubing becomes deeply stained, brittle, cracked, sticky, or unable to seal tightly. Tubing with Fittings for Enema Fix (Replacement Hose)
Replace any jar that is chipped, cracked, damaged, or no longer safe to use. Non-Toxic Mason Jar 32 oz Mug with Lid
| Product | Pump Stem for Enema Fix |
| Part type | Replacement pump only |
| Compatibility | Designed for the Enema Fix Stand Up No Mess Coffee Enema Kit |
| Primary purpose | Replace a clogged, damaged, worn, or poorly priming pump |
| Flow method | Manual pump operation |
| Included in this listing | The replacement pump stem only |
| Sold separately | Complete kit, replacement hose, and glass jar |
| Draw straw, finger grip, adapter, gasket, and tip | Use the compatible existing Enema Fix components, or purchase them separately |
Product manual: Enema Fix Manual — setup, operation, and care instructions.
Educational notice: the information on this page is provided for educational purposes only and is not medical advice. The products on this page are not intended to diagnose, treat, cure, or prevent any disease. These statements have not been evaluated by the Food and Drug Administration. Consult a qualified professional before beginning any enema routine, especially if you are pregnant, have a medical condition, or take medication. Creatrix Solutions is operated by Nuco Enterprise Solutions LLC.