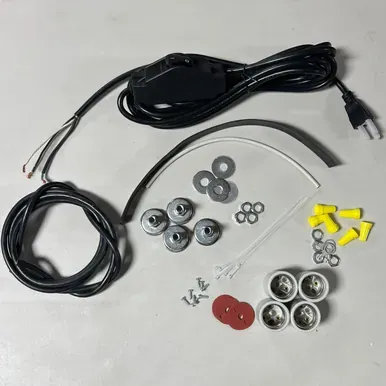
Sauna Lamp Rebuild Parts
SKU 2094
$195.00
In stock
1
Customer reviews
Reviews only from verified customers
No reviews yet. You can buy this product and be the first to leave a review.
Sauna Lamp Rebuild Parts
Product Details
Brand: Creatrix Solutions
Availability: Ships M-F, same day if ordered by 1 PM PST.
Shipping: Calculated at Checkout
MPN: SLRParts
Sauna Fix® • Lamp Repair Components
Replace Worn Sockets, Wiring, and Power-Cord Components
The Sauna Lamp Rebuild Parts Kit provides the major electrical and mounting components needed to rebuild compatible Sauna Fix® lamp socket assemblies and replace a defective power cord or switch assembly.
The kit includes four ceramic sockets, socket mounting hardware, heat-protection materials, wire connectors, shielded grounded wiring, and a heavy-duty shielded grounded electrical cord.
4 ceramic sockets Mounting hardware included Heat shield tubing Heat shrink tubing Shielded grounded wiring Heavy-duty power cord
Electrical repair product: Installation should be performed only by a person qualified to repair line-voltage electrical equipment and verify grounding, insulation, polarity, strain relief, and safe operation.
Designed for common lamp repair needs
- Cracked or heat-damaged sockets
- Loose socket mounting hardware
- Worn internal wiring
- Defective cord switch
- Damaged power cord
- Complete four-socket rebuild
When a rebuild may be needed
Do not continue operating a lamp with damaged electrical components
Repeated heat cycles, bulb replacement, movement, cord strain, and long-term use can wear electrical components over time. A damaged socket, loose connection, brittle wire, or failing switch can cause intermittent operation, excess heat, arcing, or complete lamp failure.
The rebuild kit allows compatible socket and cord components to be replaced instead of discarding the entire lamp fixture.
Before ordering, identify the failed part and confirm that the fixture itself is structurally sound and compatible with the included components.
Stop using the lamp if you notice
- Flickering not caused by a loose bulb
- Burn marks or discoloration near a socket
- Cracked ceramic socket material
- Loose bulb contact
- Hot, damaged, or intermittent cord switch
- Frayed, pinched, or hardened wiring
- Popping, or burning odor
What the kit includes
Electrical, mounting, insulation, and heat-protection components
Four Ceramic Sockets
High-temperature socket bodies for the four-bulb Sauna Fix® lamp configuration.
Socket Mounting Hardware
Includes mounting bases, threaded barrels, metal washers, fiber washers, nuts, and screws.
Heat Shield Tubing
Provides an added protective layer around wiring routed near elevated temperatures.
Heat Shrink Tubing
Used to insulate and reinforce properly completed wire connections.
Wire Nuts
Included for compatible enclosed electrical connections where appropriate.
Zip Ties
Help organize and secure wiring away from hot bulbs, guards, and moving parts.
Shielded Grounded Wiring
Replacement internal wiring designed to preserve the lamp's shielded and grounded construction.
Heavy-Duty Electrical Cord
Replacement cord assembly with shielded grounded wiring for compatible Sauna Fix® lamp fixtures.
Assembly Photo Reference
Access rebuild photographs showing component placement and assembly orientation.
Ceramic socket replacement
Why ceramic sockets are used near high-output heat lamp bulbs
Sauna lamp sockets operate close to bulbs that produce substantial radiant heat. Ceramic socket bodies tolerate higher temperatures than many common plastic lamp sockets and help maintain mechanical stability around the bulb base.
The included fiber and metal washers help separate, secure, and support the mounting assembly when installed in the correct order.
Correct hardware order matters: Improper washer placement, overtightening, loose mounting, or misalignment can damage the ceramic socket or create unsafe wire strain.
Shielded and grounded wiring
Preserve the lamp's grounding path during the rebuild
The Sauna Fix® lamp uses shielded grounded wiring to support electrical safety and reduce unnecessary electrical-field exposure around the fixture.
During a rebuild, grounding conductors, shielding, hot conductors, neutral conductors, insulation, and connection points must be restored correctly. A single wiring mistake can create shock, overheating, or fire risk.
The rebuild should maintain wire routing that keeps all conductors away from bulb glass, metal guards, sharp edges, and high-temperature areas unless protected by the supplied heat shielding.
Critical rebuild checks
- Ground continuity
- Correct hot and neutral routing
- Secure socket terminals
- Insulated wire connections
- Proper strain relief
- No exposed conductor
- No contact with sharp or hot surfaces
Power cord and switch replacement
Replace a damaged cord assembly before operating the lamp again
A power cord may require replacement if the switch becomes intermittent, the insulation is cut or hardened, the plug becomes damaged, or the cord shows heat marks or strain damage.
The replacement cord must be connected with the correct polarity and grounding. It must also be secured so pulling or moving the external cord does not transfer force directly to internal wire connections.
Do not splice a damaged external cord as a permanent repair. Replace the complete damaged cord assembly with a compatible grounded component.
Before beginning
Confirm compatibility and document the original wiring
- Unplug the lamp and allow the bulbs, sockets, guards, and frame to cool completely.
- Remove all bulbs and store them safely away from the work area.
- Photograph the existing wiring from several angles before disconnecting anything.
- Label wires and socket positions.
- Compare the replacement sockets, hardware, cord, and wire with the original components.
- Confirm the fixture voltage and bulb voltage before rebuilding.
- Inspect the metal frame, guards, mounting holes, switches, and strain-relief areas for damage.
- Review the rebuild photographs before removing the original assembly.
Do not proceed if the fixture frame is cracked, severely corroded, electrically damaged, or altered in a way that prevents a secure rebuild.
Rebuild overview
General sequence for a qualified repair professional
- Disconnect and remove the damaged cord and internal wiring.
- Remove the old sockets and retain any reusable fixture-specific hardware only if undamaged.
- Install the new ceramic sockets with the mounting components in the correct order.
- Route new shielded grounded wiring according to the original lamp layout.
- Add heat shield tubing where wiring passes near bulbs or high-temperature areas.
- Complete wire connections with compatible connectors and proper insulation.
- Apply heat shrink tubing where appropriate.
- Secure wiring with zip ties without overtightening or crushing insulation.
- Install and secure the replacement cord with proper strain relief.
- Verify that no wire can contact bulb glass, guards, sharp metal, or moving components.
- Test grounding, polarity, continuity, insulation, and switch operation before installing bulbs.
- Reinstall all guards and matching-voltage bulbs only after the lamp passes inspection.
The photo guide is a visual reference, not a substitute for electrical training, test equipment, local code knowledge, or professional judgment.
Post-rebuild testing
Do not return the lamp to service without electrical verification
Ground Continuity
Confirm that exposed metal parts are correctly connected to ground.
Polarity
Verify that hot and neutral conductors are connected to the correct terminals.
Continuity
Check each circuit path for complete and stable electrical connection.
Insulation Integrity
Confirm there are no exposed strands, pinched wires, or damaged insulation.
Switch Operation
Confirm clean on-and-off operation without flickering, arcing, or excess heat.
Controlled First Test
Perform the initial powered test in a clear, dry area while monitoring sockets, cord, switch, and wiring.
Stop immediately if any socket, wire, switch, plug, or connection becomes unusually hot, emits an odor, flickers, sparks, smokes, or makes a popping sound.
Voltage compatibility
Match the rebuilt fixture to the correct bulb and electrical supply
| System | Required bulbs | Electrical supply |
|---|---|---|
| 120V Sauna Fix® lamp | 120V heat lamp bulbs | Compatible grounded 120V supply |
| 220–240V Sauna Fix® lamp | 240V heat lamp bulbs | Compatible grounded 220–240V supply and country-specific cord |
Never mix bulb voltage and supply voltage. The rebuild kit does not automatically convert a lamp from 120V to 240V or from 240V to 120V.
Compatibility
Intended for compatible Sauna Fix® lamp fixtures
This kit is designed around the four-socket Sauna Fix® near infrared lamp configuration. It may not fit other sauna lamps, heat-lamp fixtures, socket layouts, mounting-hole patterns, wire gauges, cord systems, or guard assemblies.
Do not assume compatibility with another brand based only on bulb shape or socket appearance.
Confirm before installation: Compare socket type, mounting dimensions, fixture voltage, wiring arrangement, grounding method, wire temperature rating, and cord load requirements.
What is included
Sauna Lamp Rebuild Parts Kit contents
| Ceramic sockets | 4 |
| Socket mounting components | Mounting bases, threaded barrels, metal washers, fiber washers, nuts, and screws |
| Heat protection | Heat shield tubing and heat shrink tubing |
| Wire management | Zip ties |
| Wire connectors | Wire nuts |
| Internal wiring | Shielded grounded wiring |
| External power component | Heavy-duty electrical cord with shielded grounded wiring |
| Visual instructions | Online rebuild photographs |
Frequently asked questions
Sauna Lamp Rebuild Parts FAQ
What is the Sauna Lamp Rebuild Parts Kit?
It is a repair-parts kit for replacing compatible Sauna Fix® lamp sockets, internal wiring, insulation components, connectors, and power-cord assemblies.
When should I purchase the rebuild kit?
Consider it when sockets, wiring, the cord switch, or the power cord are damaged or no longer operating reliably and the lamp frame remains suitable for repair.
What parts are included?
The kit includes four ceramic sockets with mounting hardware, heat shield tubing, zip ties, heat shrink tubing, wire nuts, shielded grounded wiring, and a heavy-duty shielded grounded electrical cord.
Does the kit include bulbs?
No. Use matching 120V or 240V Sauna Fix® bulbs according to the fixture and electrical supply.
Does the kit include lamp guards?
Lamp guards are not listed as part of this kit. Existing guards must be undamaged and reinstalled before use.
Can I use this kit on any sauna lamp?
No. It is intended for compatible Sauna Fix® lamp configurations. Socket mounting, wiring, grounding, load, and physical fit must all be verified.
Can I rebuild the lamp myself?
Only a person qualified to repair line-voltage electrical equipment should perform the rebuild and complete the required electrical testing.
Are the rebuild pictures complete instructions?
No. They are visual assembly references. They do not replace electrical training, a wiring diagram, test equipment, or local code requirements.
Why are ceramic sockets included?
Ceramic socket bodies are suited to high-temperature lamp applications and provide better heat tolerance than many standard plastic sockets.
Why is heat shield tubing included?
It adds protection where compatible wiring must pass near elevated temperatures inside the lamp.
Why are fiber washers included?
Fiber washers help separate and support parts of the socket mounting assembly. They must be installed in the correct position.
Does the kit convert a 120V lamp to 240V?
No. Voltage conversion depends on the complete fixture configuration, bulbs, cord, wiring, and electrical supply. The kit should not be treated as an automatic voltage-conversion package.
What testing is needed after rebuilding?
Ground continuity, polarity, circuit continuity, insulation integrity, secure connections, switch function, and controlled powered operation should all be verified.
What should I do if the rebuilt lamp flickers or smells hot?
Turn it off and unplug it immediately. Do not operate it again until the lamp has been inspected and the cause corrected.
Where can I view the rebuild photographs?
Use the “View Socket Rebuild Pictures” button on this page to open the online photo reference.
Important: This kit contains line-voltage electrical repair parts. Incorrect installation can cause electric shock, overheating, fire, equipment damage, or personal injury.
Warranty or Rebuild — Which Applies to Your Lamp?
Current 3-prong lamps: start with the warranty, not this page. Every Sauna Fix® lamp with the grounded 3-prong plug carries a lifetime warranty on the fixture — sockets, wiring, switch, and cord — with repair or replacement parts provided under warranty (customer covers round-trip shipping). Contact us before ordering rebuild parts; your repair may cost you only the shipping.
This rebuild service is for earlier-generation 2-prong fixtures that pre-date the current grounded design, and for damage the warranty does not cover (cross-threaded light guards, crushing, dropping, or bent parts).