Back Trac Bundle - Medium and Hard Foam Rollers
SKU 2143
$270.00
On Sale
was $335.98 Save $65.98
In stock
1
Customer reviews
Reviews only from verified customers
No reviews yet. You can buy this product and be the first to leave a review.
Back Trac Bundle - Medium and Hard Foam Rollers
Product Details
Brand: Creatrix Solutions
Availability: Ships M-F same day if ordered by 1 PM PST
Shipping: Calculated at Checkout
MPN: BTR600HMB
Spinal Fitness • Back Trac bundle
Back Trac Bundle — Medium and Hard Foam Rollers
Both Back Trac® rollers — medium and hard density — as one bundle. The complete progression pair for restoring spinal motion: start on medium, graduate to hard, and always have the right intensity for the day your back is having.
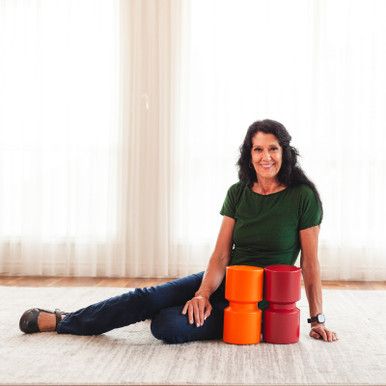
Orange medium + maroon hard6.00″ diameterPatented spine grooveSave $65.98
In the bundle
MediumOrange roller
HardMaroon roller
Size6.00″ diameter each
Savings$65.98 vs. separately
The groove
Why the Back Trac is different from every gym roller
The Back Trac is made in two densities: orange medium and maroon hard.
The Back Trac® is a 6.00-inch grooved foam roller designed around one anatomical fact: your spine should not be pressed on while you roll. Its full-length central groove lets the spinous processes float — the bony ridge of your spine travels in the channel while the muscle on either side receives the pressure. That is what makes slow, segment-by-segment rolling along the back comfortable enough to become a daily habit, and it is the roller at the heart of the 5-step Spinal Fitness system (step one: Back Trac rolling).
The spine floats
The full-length groove gives the spinous processes a channel to ride in, so the bony ridge of the spine is not pressed on while you roll.
The muscles take the pressure
The supporting edges work the transverse processes and the muscle on either side of each vertebra, one segment at a time.
Step one of the system
Back Trac rolling is step one of the 5-step Spinal Fitness system and prepares the spine for the Back-Twist and the Neck and Back Shaper rolls.
Foam rolling your backWho it is for
Who this bundle is for
- Beginners who plan to progress: start every session on medium; the hard roller is waiting when your tissue adapts — no second purchase, no shipping wait.
- Households sharing one routine: two backs rarely want the same density on the same day.
- Daily rollers: medium for recovery days and evenings, hard for working deep after training.
Bundle savings: $65.98 vs. buying the rollers separately. Prefer one density? The singles are available: Back Trac Medium or Back Trac Hard.
Two densities
Back Trac 6.00″ Hard and Medium Foam Rollers
Discover Ultimate Relief with the Back Trac Foam Roller Bundle!
Enhance your muscle care routine with our exclusive Back Trac Foam Roller Bundle, featuring both medium and hard density rollers. This versatile duo is designed to cater to all your muscle therapy needs, ensuring you have the perfect tool for every stage of your recovery and maintenance.
Medium Density Roller
Balance and Comfort
- Ideal for Beginners: Perfect for those new to foam rolling, providing a gentle introduction with moderate pressure.
- Sensitive Muscles: Great for individuals with delicate muscles, offering relief without excessive discomfort.
- Rehabilitation: Assists in the gentle recovery of muscles post-injury or surgery.
- Daily Use: Perfect for everyday muscle tension relief, maintaining flexibility and comfort.
Hard Density Roller
Intensity and Precision
- Experienced Users: Best suited for those familiar with foam rolling and able to handle more intense pressure.
- Athletes: Targets deep muscle knots, aiding in thorough muscle recovery.
- Dense Muscles: Effective for those with well-developed muscles requiring stronger pressure.
- Deep Tissue Massage: Delivers a powerful deep tissue massage, breaking down stubborn knots and tightness.
Why Choose the Bundle?
Having both medium and hard density rollers at your disposal ensures comprehensive care for your muscles. Use the medium density roller for gentle, everyday maintenance, and the hard density roller for deeper, more intensive therapy sessions.
Progressive loading
Why add weight to your Back Trac?
The bundle already gives you one progression: medium density, then hard. Adding weight on the chest is the second — and it changes what the Back Trac trains.
On its own, the Back Trac is segmental mobility and decompression preparation. The central groove lets the spinous processes float while the roller supports the structures on either side, so the spine articulates over a curved fulcrum segment by segment instead of moving as one rigid block. That restores segmental motion, reduces guarding, and prepares the spine for corrective loading.
Adding weight on the chest — a weight plate, or the Force Applicators — places a controlled load on the front of the body. The roller becomes the pivot point, and the added weight increases the leverage acting around it. You are no longer relying on body weight alone to mold the spine over the Back Trac; you are progressively increasing the corrective input.
What the added weight does
- Greater segmental articulation. The weighted torso settles more firmly around the roller as you move, so each level has a greater tendency to extend around the curve. That is especially useful for a thoracic spine that has stiffened into a forward, rounded shape from sitting, driving, computer work or forward-head posture.
- More movement for the discs and spinal joints. Disc fluid dynamics, facet spacing, ligament tension and guarding all change with position and time. The repeated loading and unloading of each pass encourages disc fluid exchange.
- Time spent in a better shape. If the thoracic or lumbar curve has flattened, the load encourages the body to spend time in the opposite mechanical direction. Repeated positioning under resistance is how Spinal Fitness progressively trains the body toward more favorable spinal curves.
- Better body awareness. Each pass under load gives the nervous system repeated information about where the trunk is in space and how much muscle tension it takes to hold that position — building proprioceptive control instead of leaving alignment to passive stretching alone.
Restoring segmental motion and spinal alignment may improve the mechanical environment surrounding the spinal joints, discs and exiting nerve roots by reducing abnormal compression, shear and muscular guarding.
A plank trains the core to stop movement. Weighted Back Trac rolling trains the core to stabilize the spine while the spine is moving — allowing the segmental motion you want while preventing the motion you do not. That is a practical definition of functional core strength.
It turns the Back Trac into a core exercise
Once resistance sits on the chest, the abdominal wall cannot simply relax. The weight wants to draw the ribs and trunk farther around the roller, and the core has to regulate how far and how quickly that happens. Several systems work at once:
- Transverse abdominis increases circumferential trunk stiffness.
- Internal and external obliques resist unwanted rotation and side-bending as the body passes over the roller.
- Rectus abdominis acts as the anti-extension brake, controlling how far the rib cage opens away from the pelvis.
- Multifidus and the deep spinal stabilizers control individual vertebral segments as the spine moves over the roller.
- Diaphragm and pelvic floor take part in the trunk’s pressure and stability system.
- Glutes and hamstrings become much more involved when the pelvis is raised into a bridge while rolling.
The progression
1. Unweighted Back Trac
Mobility → reduced guarding → segmental articulation
2. Weighted Back Trac
Mobility + progressive resistance → active stabilization → proprioception → controlled spinal movement under load
3. Force Applicators
Padded chest pads clamp onto an ordinary 1″ or 2″ barbell and rotate to rest comfortably over the chest, so the load is placed more deliberately than a plate laid on the chest — applied in a controlled direction while you hold the spinal position you want. Coming soon.
See the Force ApplicatorsThe bigger benefit
People rarely get into trouble with their backs while lying perfectly still. Trouble starts when the spine has to hold its shape against gravity and outside force. Weighted Back Trac rolling progressively teaches the body to maintain a better spinal shape under increasing load — bridging the gap between passively getting the spine into a better position and training the body to control that position when force is applied. It follows the order of the Spinal Fitness system: decompression first, then corrected loading, structural rebuilding and stabilization.
Adding weight safely: Master slow, unweighted rolling first — weight is a progression, not a starting point. Begin light and add load in small steps. Keep the weight on the chest below the collarbones and steady it with both hands, and keep breathing throughout. If the ribs flare, the low back arches, or you cannot control the speed of the roll, the load is too heavy. Stop if you feel sharp pain, numbness, tingling or dizziness, and clear loaded rolling with your healthcare provider if you have an injury, osteoporosis, or a spinal condition.
Eileen’s routine
Back Trac Core Exercises and Spinal Articulation Routine
Have back pain? Start with the orange Medium Back Trac — not the maroon Hard version. Move to the Hard roller only once rolling and exercising on the Medium feels comfortable.
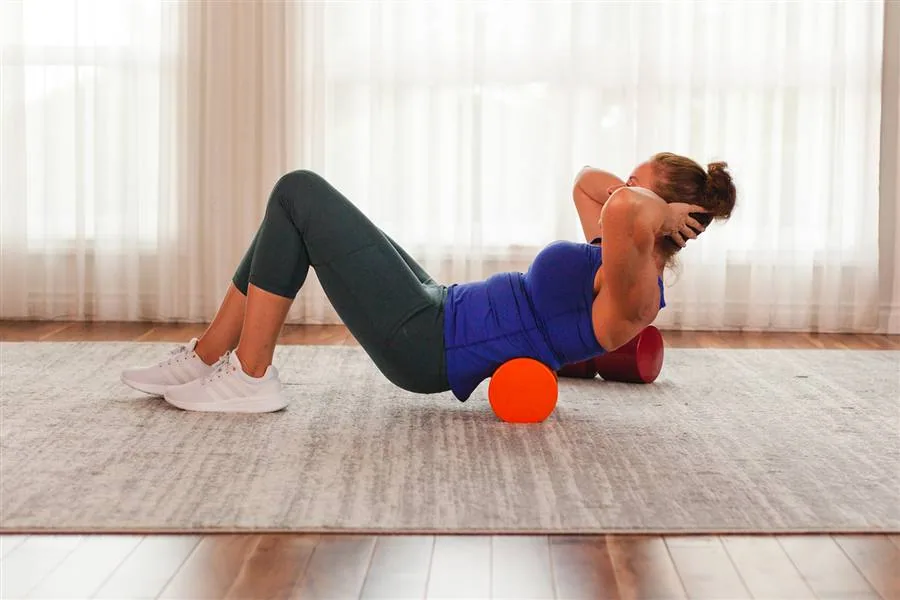
I use a 6-inch-diameter Back Trac under my low back during abdominal exercises. The Back Trac supports the natural lumbar curve, while its center groove allows the spinous processes to float in the channel rather than being compressed directly against the roller.
During the exercises, my arms can be extended out even with my shoulders, overhead, or overhead while holding weights as a counterbalance.
1
Set Up the Back Trac
Lie on your back and position the orange Medium Back Trac crosswise underneath the natural curve of your low back.
Center your spine over the groove so the spinous processes remain suspended within the channel instead of pressing directly into the surface.
Your pelvis and upper back remain supported while the Back Trac maintains the lumbar curve.
Before starting:
- Gently brace the abdominal wall.
- Keep the pelvis stable.
- Keep the lower ribs controlled rather than allowing them to flare upward.
- Maintain normal breathing.
- Position the arms according to the desired difficulty.
Arm-position options:
- Arms extended sideways at shoulder height provide the greatest stability.
- Arms extended overhead create a longer lever and additional counterbalance.
- Light weights held overhead can provide even more counterbalance against the weight of the legs.
The weights should help balance the movement rather than pull the rib cage into excessive extension.
2
Flutter Kicks
Start with both legs extended upward.
Gradually lower the legs until you reach the lowest position where you can maintain abdominal control and keep the pelvis stable over the Back Trac.
Alternate the legs up and down using small fluttering movements initiated from the hips.
Technique
- Keep the legs long.
- Keep the knees slightly relaxed rather than rigidly locked.
- Use relatively small kicks.
- Keep the pelvis quiet.
- Maintain abdominal tension.
- Keep breathing throughout the movement.
If the low back begins doing most of the work, raise the legs slightly higher.
If using weights overhead, keep the arms stationary while the legs perform the flutter kicks.
Starting range: approximately 15–30 seconds
3
Straight-Leg Raises
Begin with both legs together and pointing toward the ceiling.
Brace the abdominal wall.
Slowly lower both legs toward the floor while maintaining control of the pelvis and rib cage.
Stop lowering before:
- the pelvis begins rocking,
- the ribs flare upward,
- abdominal control is lost, or
- you feel uncomfortable spinal pressure.
Slowly raise the legs back toward the ceiling.
Avoid swinging or using momentum.
Progressions
If needed, progress through:
- One-leg lowering
- Alternating leg lowering
- Bent-knee double-leg lowering
- Straight-leg double-leg lowering
The overhead weights may remain stationary and serve as a counterbalance to the legs.
Starting range: approximately 6–12 slow repetitions
4
Frog Pumps
Bring the soles of the feet together and allow the knees to open outward.
Bring the heels relatively close toward the hips.
Brace the abdomen first.
Squeeze the glutes and gently lift the pelvis.
Pause briefly at the top and then lower under control.
The movement should come primarily from the glutes rather than aggressively arching through the low back.
Because the Back Trac already supports the lumbar curve, the hip lift does not need to be large.
Think: Glutes lift the pelvis — the low back stays supported.
Starting range: approximately 10–20 controlled repetitions
5
Dead Bug
Position the hips and knees at approximately 90 degrees, with the lower legs parallel to the floor.
Brace the abdomen and establish a stable pelvis over the Back Trac before moving the arms or legs.
Beginning Version
Keep the arms extended overhead or out beside the shoulders. Slowly lower one heel toward the floor. Return to the starting position. Alternate sides.
Intermediate Version
Extend one entire leg outward at a time while keeping the opposite leg in the 90-degree position. Return and alternate.
Traditional Dead Bug Version
Hold the arms vertically above the shoulders, with or without light weights. Slowly extend the opposite arm and leg away from one another. Return to center and repeat on the other side. Exhale as the arm and leg extend.
The movement stops when the pelvis or rib cage begins moving excessively.
Starting range: approximately 6–10 controlled repetitions per side
6
Using the Different Arm Positions
The position of the arms changes both stability and leverage.
Arms Out at Shoulder Height
This provides the greatest side-to-side stability and is useful when learning a movement or performing more difficult leg exercises.
Arms Overhead
Moving the arms overhead lengthens the body and provides a counterbalance to the weight of the legs.
Weights Overhead
Holding light weights overhead increases the counterbalancing effect.
Keep the shoulders comfortable and maintain control of the lower ribs.
The goal is not to force the hands or weights to the floor. If reaching the floor causes the ribs to flare excessively, simply keep the arms slightly elevated.
7
Suggested Exercise Sequence
A good sequence is:
- Dead bug
- Straight-leg raises
- Flutter kicks
- Frog pumps
Perform approximately 2–3 rounds depending upon conditioning.
Controlled repetitions are more valuable than continuing until technique breaks down.
As the abdominal muscles fatigue, the hip flexors can begin contributing more strongly, so stop the set while good pelvic and abdominal control can still be maintained.
8
Rolling With the Maroon Hard Back Trac
For spinal rolling and articulation, I typically use the maroon Hard Back Trac.
Unlike a conventional solid foam roller, the Back Trac has a center spinal groove. When the spine is properly centered, the spinous processes float inside that groove instead of being pressed or crushed directly between the body and the roller.
This design allows the raised portions of the Back Trac to contact the tissues and structures on either side of the spine while leaving the central spinous processes unloaded.
I can progressively roll from the low back upward through the thoracic region and toward the upper back and neck area, moving slowly and maintaining control.
Rolling Technique
- Center the spine in the Back Trac groove.
- Begin in the lower-back area.
- Keep the feet planted for control.
- Slightly lift the hips as needed.
- Slowly move the Back Trac upward a small distance at a time.
- Allow each area of the spine to articulate over the curved surface.
- Pause over areas that feel particularly stiff.
- Breathe out and allow the surrounding muscles to relax.
- Continue gradually upward rather than rapidly rolling back and forth.
The purpose is controlled spinal articulation, not aggressive rolling.
The groove should remain aligned with the center of the spine throughout the movement.
9
Adding Weight for Greater Spinal Articulation
Once comfortable with unweighted articulation, weight can be added carefully.
Place a manageable weight securely against the chest.
With the spine centered over the Back Trac groove:
- Settle into the position.
- Exhale.
- Allow the spine to gently articulate over the curved surface.
- Return toward neutral.
- Move the Back Trac slightly to the next spinal level.
- Repeat.
The added weight increases the gravitational load and can create greater articulation without requiring aggressive movement.
Another option is extending the arms overhead while holding a relatively light weight. Because the arms form a longer lever, even a modest weight can substantially increase the stretch.
More weight is not necessarily better. The goal is gradual mobility and articulation while remaining comfortable and completely controlled.
10
Three Technique Checks for Every Exercise
Throughout both the abdominal exercises and spinal articulation work, watch for three things:
1. Stable pelvis
The pelvis should not be rocking uncontrollably during the leg exercises.
2. Controlled rib cage
Avoid allowing the lower ribs to suddenly flare upward as the arms or legs move away from the body.
3. Comfortable spinal sensation
You may feel muscular effort, stretching, pressure alongside the spine, and joint movement.
Stop or modify the movement if you experience: sharp pain, sudden pinching, electrical sensations, numbness, tingling, or symptoms traveling into an arm or leg.
How I Use the Two Back Tracs
Orange Medium Back Trac
Used underneath the low back as a stable support while performing flutter kicks, leg raises, frog pumps and dead bugs. Its shape maintains the lumbar curve while the center groove allows the spinous processes to remain suspended.
See Back Trac MediumMaroon Hard Back Trac
Used for more progressive spinal rolling and articulation. The groove keeps direct pressure off the spinous processes while the raised sides contact the tissues and structures alongside the spine.
See Back Trac HardThis combination lets me use the Medium Back Trac for supported core exercise and the Hard Back Trac for progressively greater spinal articulation.
From the inventor
My experience
I use the orange Medium Back Trac under my low back, holding weights in my hands as counterbalances, while I do flutter kicks, leg lifts, frog pumps and the dead bug. The Back Trac protects the low back curve, which is critical — I never do those exercises without it.
For rolling, I typically use the maroon Hard roller from my low back up to my neck, and then add weight on my chest for even more joint articulation.
Specs and safe use
How to use it — and use it safely
How to roll
Roll slowly along the muscles beside the spine with the groove tracking your vertebrae — segment by segment, never fast, never on the bone. Full technique, positions, and progressions are in the video guide: How to Back Trac. Begin with short sessions on the medium roller and let comfort, not ambition, set your pace. Stop if you feel sharp pain, numbness, or tingling, and clear rolling with your healthcare provider if you have an injury, osteoporosis, or a spinal condition.
What is in the box
- Back Trac® 6.00" Medium density grooved foam roller
- Back Trac® 6.00" Hard density grooved foam roller
Specifications
| Rollers | 2 (one Medium, one Hard) |
|---|---|
| Diameter | 6.00 inches each |
| Length | 12 inches each |
| Colours | Orange (medium), maroon (hard) |
| Groove | 360-degree, full-length spine groove |
| Surface | Self-skinning foam |
About self-skinning foam: Each roller is molded with a durable self-skinning surface. Slight color variation, faint lines, small surface imperfections, and tiny bubbles are natural characteristics of the self-skinning foam manufacturing process — they are cosmetic, unique to each roller, and do not affect performance or durability.
Sales policy: Foam rollers are sold as-is and are non-returnable for hygiene reasons.
FAQ
Frequently asked questions
Should I buy the bundle or a single roller?
If you are certain you only want one density, the singles are available: Back Trac Medium or Back Trac Hard. The bundle saves $65.98 versus buying both separately — the right call for anyone who plans to progress or share.
Which density should I start with?
Medium, almost always. It delivers real work while your tissue adapts. The hard roller earns its place once medium rolling feels routine rather than intense.
Why is there a groove down the middle?
So your spine never takes the pressure. The spinous processes ride in the channel while the muscles on either side get rolled — the feature that separates the Back Trac from flat gym rollers.
Can I use the Back Trac in a sauna?
Many customers roll inside the Sauna Fix® Exercise Sauna — warm tissue takes rolling beautifully. See stretching and rolling in heat.
Do I need to add weight to benefit from the Back Trac?
No. Unweighted rolling restores segmental motion and reduces guarding on its own. Adding weight on the chest is the next progression once unweighted rolling feels routine — it adds progressive resistance and turns the roller into a core-stabilization exercise.
Keep exploring
Medical disclaimer: Back Trac® products are not intended to diagnose, treat, cure, or prevent any disease or medical condition. Consult a qualified healthcare provider before beginning a new exercise routine, especially if you have an injury or medical condition.